Saturday, October 26, 2013

Clever Title #1

 Things are happening.
I began shaping the feet using the bandsaw I materialized earlier. It had no problem cutting 2.25" ash.

I cleaned the cuts with the spindle sander and routed the edges to 1/4" round.

 I cut material away from the vertical supports for the upper mounting piece or whatever. I also routed the edges of these supports.

Test fit everything together. The mortises for the cross beams needed filed at this point.

I glued and clamped the vertical supports into their mortises. The clamps provided just enough pressure to hold the supports in place.

SAME.

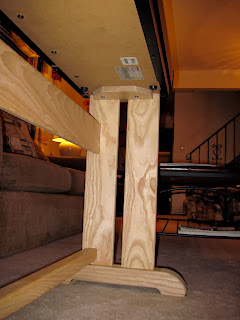
Here you can see the upper mounting pieces installed. No glue for this. I only used 4 countersunk wood screws to hold everything solid. 

Another test fit. The vertical supports that extended below into the feet were trimmed flush with the feet.

 The horizontal cross beams neat mounted to the vertical parts, so T-nuts were recessed into them to provide a nut for a bolt to anchor. This required a series of holes to be drilled to allow the nut to seat flush and strongly into the beams.

This wide piece has 4 t-nuts (2 per side) while the lower, thinner piece has only 2 t-nuts (1 per side). Holes were drilled into the vertical supports to allow the beams to bolt to the verticals.

With a few holes drilled in the mounting brackets, the piano was attached. With everything tightened, there is almost no wobbling of the piano. It's much more sturdy than I would have predicted.

M5 bolts hold the piano down.

I still need to trim the ends of the cross beams.

Wonderful.

My next step is to find a good mix of stains to match the fake wood on the piano. I will stain the stand and finish it with minwax polycrylic. I am also planning a matching piano bench.

More to come.

Saturday, October 12, 2013

Sing us a song, it's a piano stand.

 I needed a proper stand for my digital piano, so I'm building one. I've finally gained enough motivation to do more woodworking. I designed the whole thing in AutoCAD using dimensions from commercially available stands and real pianos. I've learned more about AutoCAD "Layout" features which helped make the plotting easier. The wood I'm using here is reclaimed ash ceiling panels from a house that had smoke damage. They don't have any 'flutes' or whatever you call them on the bottom, so there's very little waste beyond removing the tongue and groove.

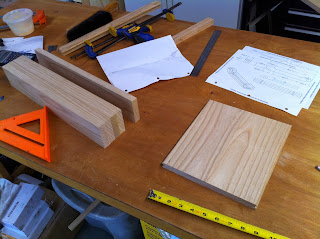
I start with picking the lengths I need from the pile, seen on the right. I keep the plan printouts atop the appropriate length so I know which piece is for what.

 I then cross cut the pieces to length and ripped down one side. You can see the plans here next to there respective pieces.

I ripped the remaining side to achieve the proper width.

Two long glued lengths form the "footrest" cross beam. This created a satisfyingly strong and heavy piece of hardwood lumber that could easily knock a person unconscious. The faces were planed before glued together.

The rest of the pieces were planed to a consistent thickness.

 I had to biscuit join two pieces to achieve a width necessary for the pieces the piano will be mounted to. The next picture should clear up what it's for.

 The 6 sided piece above is the biscuit joined piece. The grain needs to be in this direction for maximum strength. This is only a mock up of the final design.

These are the two cross members. I did not intentionally choose these pieces for their grain appearance. They look brilliant. You can see some flame in the ash on the thinner piece on the right.

The cross members need a mortise to sit in, so I made this template out of 3/4" plywood.

After a number of slow and careful passes (ash is quite hard), I've cut them out. They will need a bit of filing at this point so the cross members fit.

This the beginning of the feet. I make a mortise with three glued layers. The vertical braces in the previous picture will sit as 'tenons' in these.

A quick test fit. The cross members are a little tight. The feet will be shaped on my bandsaw and tidied up with the spindle sander. The rest will be put together soon. 

I plan to finish this with a dark red stain and polycrylic semigloss to match the simulated wood grain on my digital piano (Yamaha P120).

More soon. Goodbye
-A