I haven't much touched the didge since my last post, as I haven't had time. I did find time to record this. It includes tracks of my built 335
Enjoy,
Andrew
Monday, June 6, 2011
Wednesday, May 4, 2011
Didgeridoo/Piano update or somethin.
 Since the beginning of this blog, i had set aside an ash branch to season for a didgeridoo. I was finally able to get to it and carve it out.
This first image shows how I split the branch. I would like to recommend not doing such a task by hand, such as this. This is much more suited for a bandsaw, which i do not possess. I started out with the small 6" Marples saw shown in the foreground. About 1' into the branch, which took 6-8 hours, it snapped at the handle. It was incredibly flimsy anyway, so this was expected. I then purchased the giant Japanese pull saw shown sticking out of the branch. With a sturdier build and course cut, i finished the job in 1/3 the time (which still took over 3 days of cutting).
 Once split, I employed this King Arthur Lancelot 4"carving disk to hollow out the didge. This thing is a beast. Brand new and sharp, this blade removes a lot of material, very very quickly.
 It attaches to a standard angle grinder as shown. I marked with a pencil an even amount down the side as a stop mark for carving. I made sure the cut was as round as possible on both sides.
 A finished half. A propane torch to the inside removes any loose wood shavings sticking out. A light coat of polyurethane seals the inside before the halves are joined.
 An ample amount of Titebond I was applied to the seams and the entire didge was held together with a few clamps. The cuts made earlier to split aren't the best and leave some large gaps in the seam. This will be sealed later with epoxy before final finishing.
Since this, i've shaved at most 1/4" off all around, and sculpted the mouthpiece. I will eventually put in a beeswax mouthpiece after finishing.
Here's a sound bite of me playing the didge.
Didgeridoo sample
Still haven't gotten circular breathing down.
*****************************
I learned the piano to a decent degree since last christmas when i got a cheap walmart keyboard to practice. I found ragtime to suit me very well. It's very similar to my guitar playing style in the sense of bass and melody structure.
Here's me playing Scott Joplin's Maple Leaf Rag on a Yamaha upright piano:
Scott Joplin - Maple Leaf Rag (Andrew's cover)
Monday, April 25, 2011
Build Update #20
My roommate allowed me to use his good SLR digital camera to take some 'professional' pictures. I figured i'd upload the full resolution pictures via external linkage. They're all great, enjoy
Full in stand by desk
Body close-up in stand
Body close-up on bed
Body close-up on bed 2
Peghead close-up
Body back showing excellent bookmatch
Neck and body candy coating. Shows back contours
Guitar front with roommate for scale
The walnut is amazing
On blueprints 1
On blueprints 2 (holographic grain)
I was going to make this post include my didgeridoo project and piano 'experimentation', but that'll have to wait until my next post within the next few days.
Enjoy the craftsmanship
-Bauer
Sunday, March 6, 2011
Build Update #19
This post may be the last major post of this build. Yes, it's been over a year since I began. All the planning in the beginning was well worth it. Would I build another guitar? Absolutely.
Here are some pics.

Oh, it plays nice. The nut still needs rounded and glued down. Without gluing it down, the strings go in and out of tune do to the nut moving around.

Still need to touch up that area near the bottom.

The mahogany grain is absolutely spectacular. In direct sunlight, it shows a holographic soft red pattern, while indoor lighting gives it a brown/red candy look. Love it.

The lacquer has hazed a little bit since I buffed it, more noticeably on the walnut. No big deal. I can rebuff in a few months again if i wish. The string alignment is spot on, as shown. The neck pickup mounting ring was probably slanted for a Les Paul, so it places the humbucker a bit out of wack (not parallel to the strings). No big deal, again.
I would love a 3 or 5 ply short black cream pickguard with gold mounting brackets, but for the life of me i cant find anything relatively cheap (it's plastic, why should it cost more than $50?!).
Will post a video soon once I adjust the nut and the humbucker ring.
I would like to thank everyone for following this blog. Hope those who were looking for help with building found what they needed here.
As a side note, I measured a ~16-18% MC in the didge branch so I stripped off the bark and will split and hollow it once I get the angle grinder chainsaw attachment. Expect updates for that too.
-Peace
Andrew Bauer (bauerb2)
Sunday, February 6, 2011
tsoP deltitnU

-at the bottom front (covered from view by the white towel) water during wetsanding got underneath the lacquer and swelled the wood. Need to respray the area with an aerosol. Luckily, everything else is perfect, so i can completely button up everything else and worry about the spot later (it's an area about 1" by 4").
-Electronics went in smoothly, lacquer's intact. Both pickups work this time.
-Wetsanded with stewmacs papers: 800,1000,1200,1500,2000 grits. Buffed by hand with ScratchX 2.0 and buffed with stewmacs foam buffer with SwirlX.
-Installed gold keystone tuners this time. Drilled the screw holes for the tuners.
-This nitro lacquer reacts with the vinyl covers on my guitar stands (something i noticed before refinishing, when the lacquer pealed away on the neck and bottom), so the towels isolate the finish from the stand.
-I still need to finish shape the nut; buy and install a pickguard, truss rod cover, and strap buttons; and tidy up the lacquer around the fretboard.
Full update soon.
Go Stillers.
Friday, January 7, 2011
Build Update #18
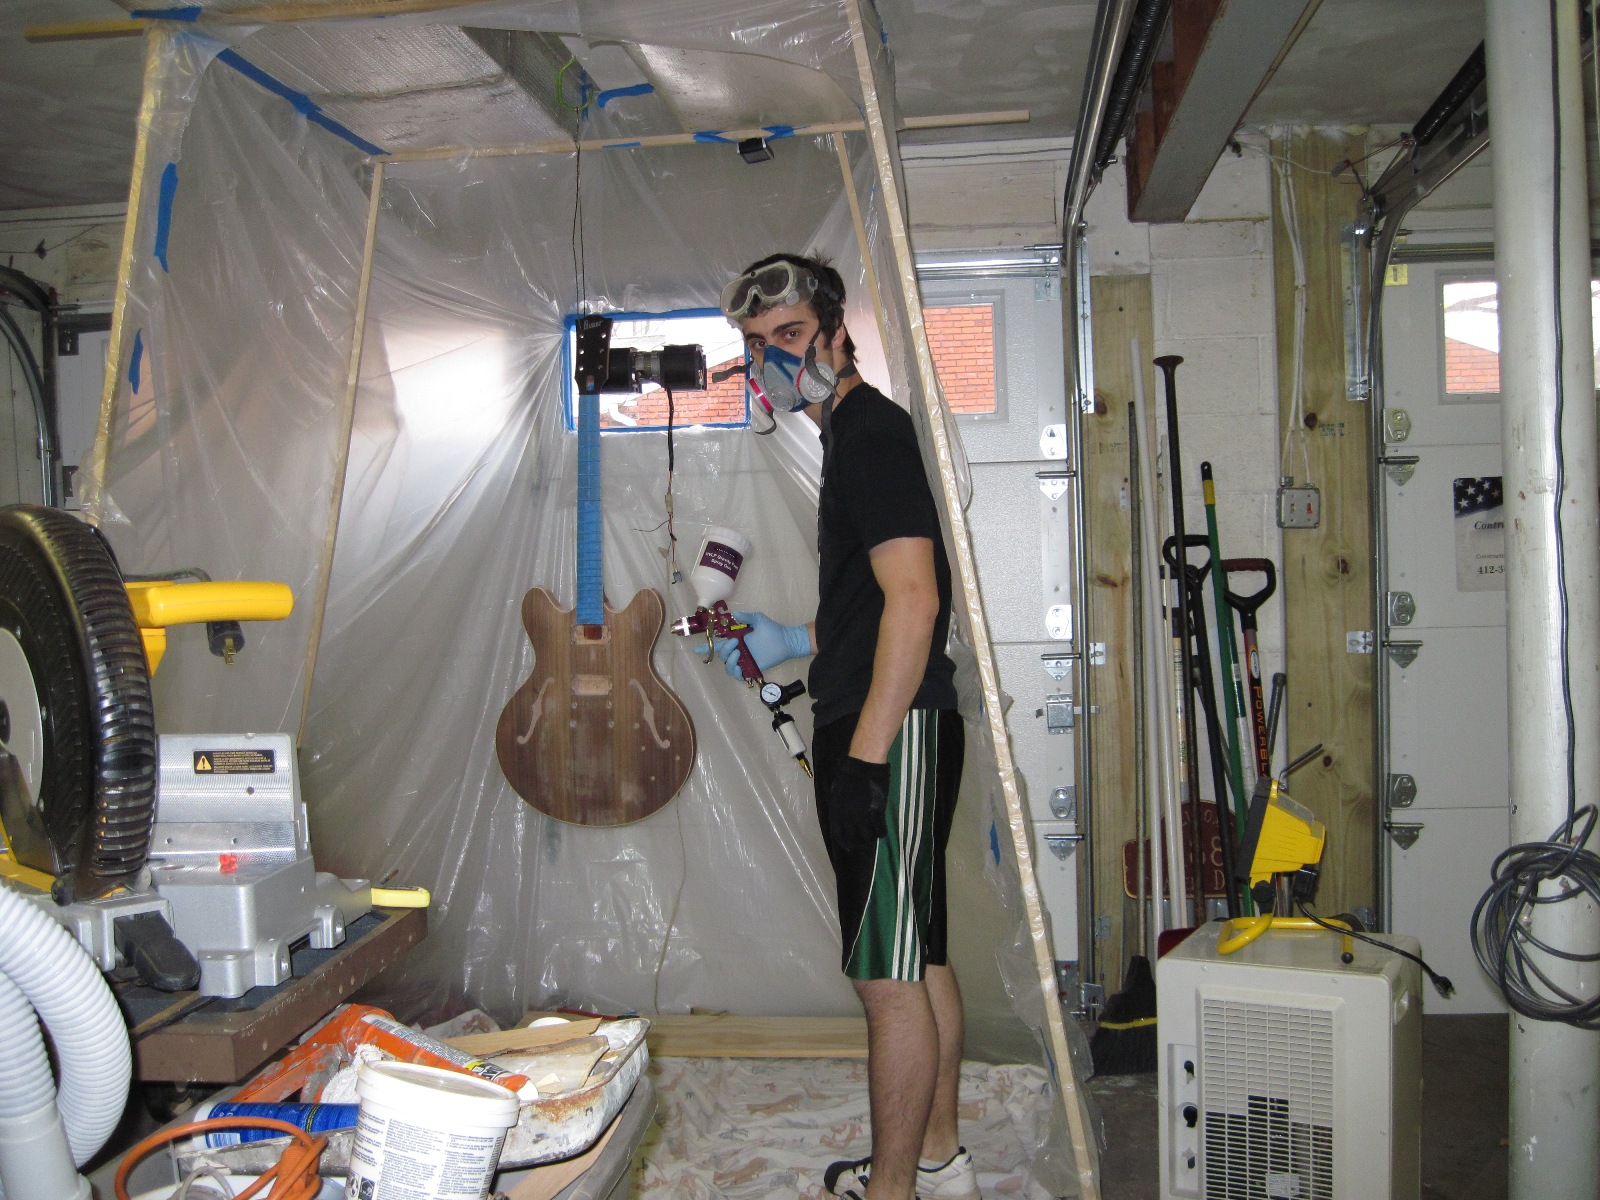
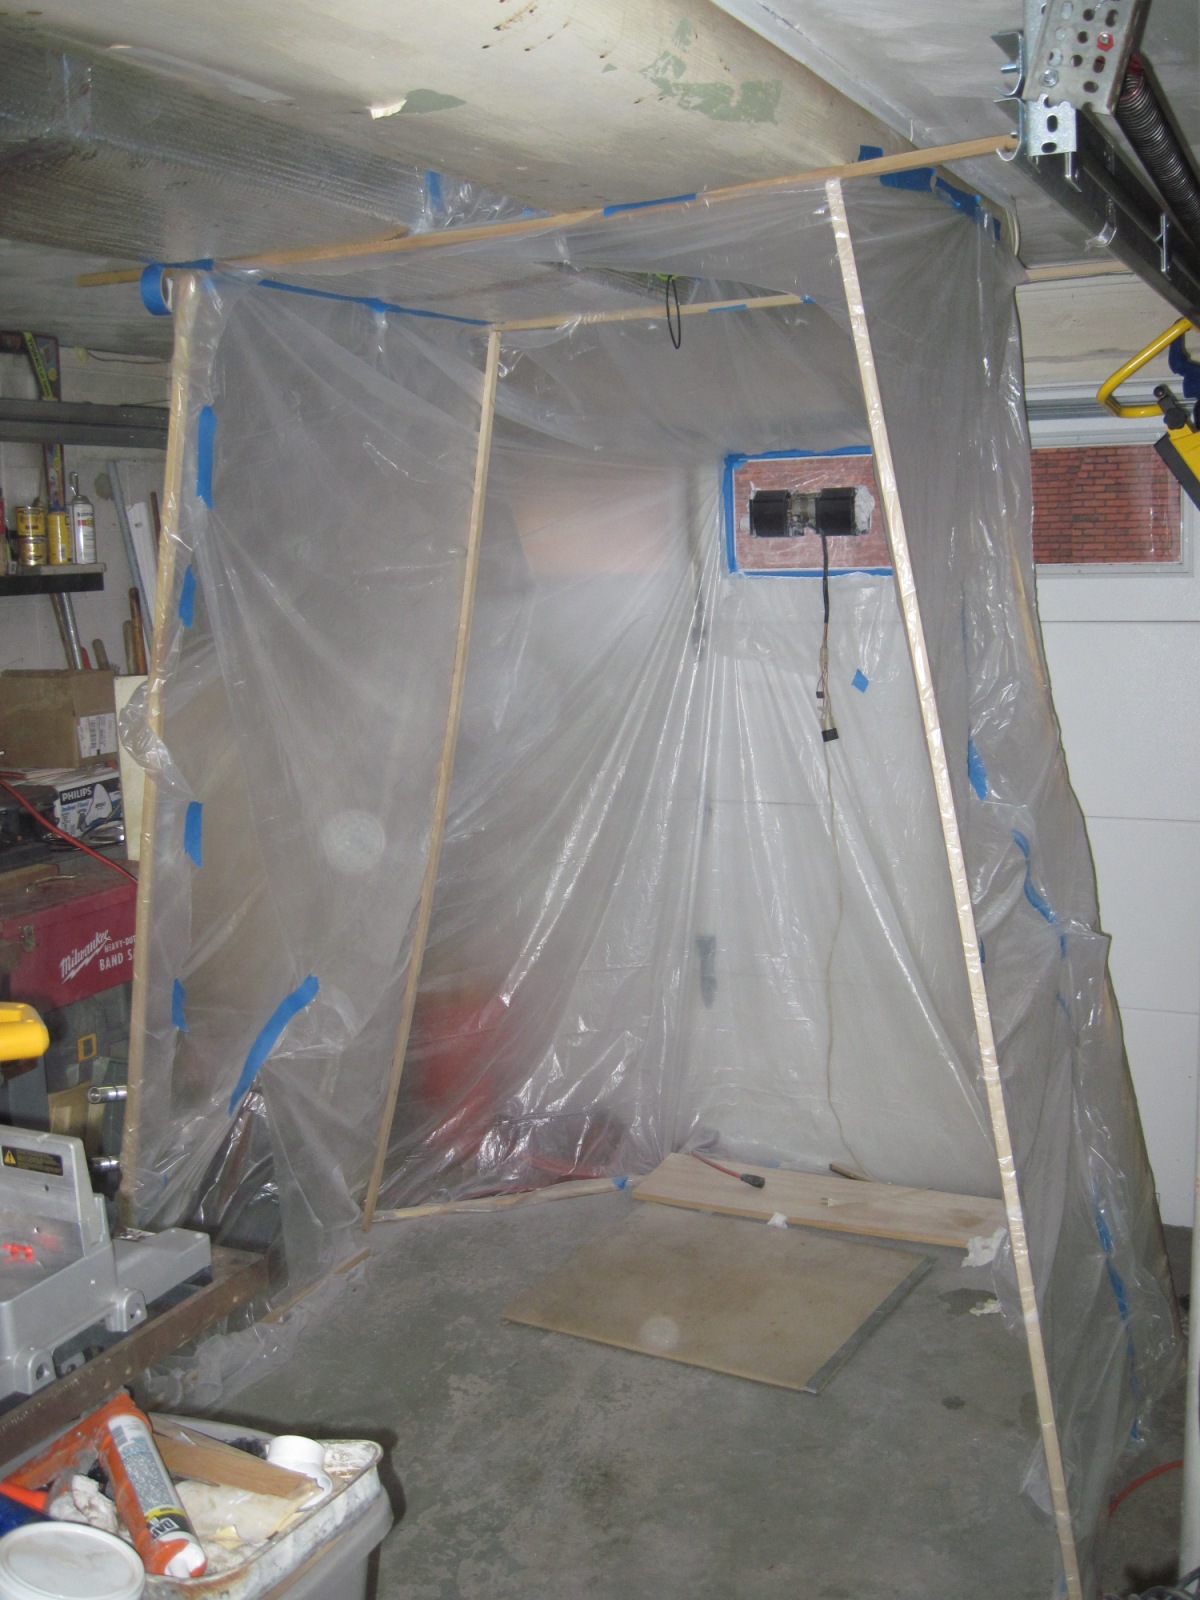
Went through a whole quart of Behlen's Stringed Instrument Lacquer on the guitar. I used a Harbor Freight HVLP spray gun (#66222) with a 4 gallon air compressor. An air filter seen attached below the air regulator on the gun removes most moisture/oil in the air supply.

I set up the the booth the same as i did before. This time I used a microwave oven exhaust fan to vent any fumes. While it moves a good deal of air, i found the height location to be of poor choice as much of the fumes gather near the floor. Bending down and inspecting the body proved somewhat overwhelming as the respirator struggled to filter the fumes. I had two 2kW heaters cranked to bring the 45 degree garage up to 66 degrees. A dehumidifier was ready to help with the humidity, but it was unneeded as it's winter and the air was already dry (25-35%).

Another look. The exhaust fan fit into a custom lexan windowpane, leaving the garage door shut to keep the heat in the garage. Return air is pulled from the preheated house. A carpet foam was placed on the floor just in case, for some insane reason, the guitar were to fall. Just covering my bases.

The headstock was given its new black dye and the body was given a full sanding with 400 grit. You can see in this picture the areas where i sanded back to the wood (appear whiter than the body). I needed to do this because as some spots received damage underneath the existing lacquer, so it had to be removed.

After spraying a few coats, the areas that i sanded back showed up darker as seen above. However, this is only but an illusion, as it is actually glossier rather than darker. I assumed it was due to the bare wood not being sealed, so these first coats were thinned to about 60% lacquer/40% thinner. Unfortunately, after applying all 10 coats to the body, these spots still remained glossier than the rest, even after sanding between coats.

I tested this exact scenario on a scrap piece of walnut laminate with the same results occurring. Fortunately, on the tested piece, the shiny 'darker' spots disappeared completely through wet-sanding, leaving a spot free, glass smooth finish.

Noticeable blemishes seen on the walnut visible here on the mahogany neck. It surprises me still that, after many layers of lacquer and level sanding, the blemishes still exist. As long as it'll disappear in the final sanding, i'm not worried.

I rounded the edges of the f-holes. This quick modification made the guitar look so much better than before.

Looking good. After tweeking all the settings on the HVLP gun and getting a good hand in spraying, I was able to apply even, thick coats, preventing major orange peal. Upon inspection, there appears to be some grain still poking through in some spots, but it is not as major as before and will sand out (mostly) in the end.
I'm glad i ran into these problems now. I've learned so much doing lacquer touchups and level sanding that i feel i'm ready for any repairs I may encounter in the future. I would love to start from scratch and avoid all these problems, but that would have to wait for guitar #2. Perhaps next summer.

I set up the the booth the same as i did before. This time I used a microwave oven exhaust fan to vent any fumes. While it moves a good deal of air, i found the height location to be of poor choice as much of the fumes gather near the floor. Bending down and inspecting the body proved somewhat overwhelming as the respirator struggled to filter the fumes. I had two 2kW heaters cranked to bring the 45 degree garage up to 66 degrees. A dehumidifier was ready to help with the humidity, but it was unneeded as it's winter and the air was already dry (25-35%).
Another look. The exhaust fan fit into a custom lexan windowpane, leaving the garage door shut to keep the heat in the garage. Return air is pulled from the preheated house. A carpet foam was placed on the floor just in case, for some insane reason, the guitar were to fall. Just covering my bases.

The headstock was given its new black dye and the body was given a full sanding with 400 grit. You can see in this picture the areas where i sanded back to the wood (appear whiter than the body). I needed to do this because as some spots received damage underneath the existing lacquer, so it had to be removed.

After spraying a few coats, the areas that i sanded back showed up darker as seen above. However, this is only but an illusion, as it is actually glossier rather than darker. I assumed it was due to the bare wood not being sealed, so these first coats were thinned to about 60% lacquer/40% thinner. Unfortunately, after applying all 10 coats to the body, these spots still remained glossier than the rest, even after sanding between coats.

I tested this exact scenario on a scrap piece of walnut laminate with the same results occurring. Fortunately, on the tested piece, the shiny 'darker' spots disappeared completely through wet-sanding, leaving a spot free, glass smooth finish.

Noticeable blemishes seen on the walnut visible here on the mahogany neck. It surprises me still that, after many layers of lacquer and level sanding, the blemishes still exist. As long as it'll disappear in the final sanding, i'm not worried.

I rounded the edges of the f-holes. This quick modification made the guitar look so much better than before.

Looking good. After tweeking all the settings on the HVLP gun and getting a good hand in spraying, I was able to apply even, thick coats, preventing major orange peal. Upon inspection, there appears to be some grain still poking through in some spots, but it is not as major as before and will sand out (mostly) in the end.
I'm glad i ran into these problems now. I've learned so much doing lacquer touchups and level sanding that i feel i'm ready for any repairs I may encounter in the future. I would love to start from scratch and avoid all these problems, but that would have to wait for guitar #2. Perhaps next summer.

Subscribe to:
Posts (Atom)
