Monday, December 10, 2012

Rebuild: Update 12

Chemicals. Smelly Chemicals. Smelly Chemicals in Cans.
Naphtha for surface prep. Klean-Strip Lacquer Thinner for lacquer clean up, and Behlen Qualalacq Lacquer Reducer (Lacquer Thinner) for actual thinning. Vinyl Sealer for sealing and adhesion purposes on the epoxy filler. Behlen's Stringer Instrument Lacquer for its obvious use.

I'm still using the purple Harbor Freight HVLP Gun #66222.
 
 About $70 in finishing solvents and lacquers. It's good practice to use a good lacquer thinner for thinning. I believe the cheaper thinners have more moisture/solids in them which can blemish the finish. However, I've heard plenty of people having success with cheap thinners. I recommend doing some research, but I'd say use good thinners, and you won't have a problem.

Same garage booth. Temp and humidity are perfect. Shown above is about the lowest both have gotten over 4 days. They have gone up to about a max 48% and 70F. With the small microwave fan blowing out the garage door window, warm and dry air is pulled from the air conditioned house. Two floor heaters brought the temp up a few degrees.


Da' Boof. Every consecutive booth I've built loses craftsmanship. This 3rd one is incredibly half-assed. Two 9'x12' 3 mil tarps taped and clamped to the ceiling. No poplar braces. Nothing. It'll do.

After coat 7. (orange peel looks much less pronounced in person)

I didn't document much on the actual spraying. It was a lot of fiddling with air flow, air pressure, fan shape, and fluid control knobs on the HVLP gun.

The first 3 coats were awful. Incredible orange peel. I didn't lay on enough material and the air pressure and CFM was shit because I accidentally choked the supply air by leaving the pressure regulator down low at the compressor.

The next 3 went on nicely, but the orange peel from the previous coats still showed through. I had added about 10% thinner. After 48 hours curing, I level sanded the finish (3-4 hours of straight sanding) with 400 grit dry.

The last 2 coats were thinned 50/50. I applied it as thick as I could. The results were amazing. The final result was a rather respectable smooth finish, especially when the value of the tools used is considered.
 Wonderful. The wet sand/buff work will be quick and painless.

I didn't level enough on the headstock, and some bigger orange peel has shown through. Not a problem.

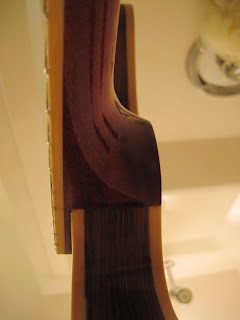
The wood grain depth and holographics are much more pronounced with this epoxy, sealer, lacquer finish than in previous attempts. The mahogany neck looks fantastic.

After coat 7. Some sanding marks shown through. It disappeared after the final coat 8. The leveling and flow-out of the lacquer is quite satisfactory. 

After coat 8, hanging in an unused shower. The fretboard tape was carefully removed 24 hours after the last coat. The f-hole paper towels were carefully pulled out. Thumbs up.

It's hard to capture the texture.


I almost don't need to buff it.

This mahogany is beautiful. On a side note, I've determined the type of mahogany that I used. I realized through working the wood that it had a differing figure and smell compared to 'regular' mahogany (honduran, etc.). It smelled like flowers or old lady perfume when tooled. Some folks on a woodworking subsection on Reddit linked to a wood database and I found the only type of mahogany that smells. http://www.wood-database.com/lumber-identification/hardwoods/santos-mahogany/

Now to wait 1-3 months to wet sand and buph.

-Andrew

Wednesday, November 14, 2012

More jigs and frame nonsense.

 The guitar is still relaxing. I still haven't ordered the sealer, so it may be a while until I spray.

In the meantime, I've been prepping again for future woodworking projects by building jigs and tools.

Cross cut sled:
I had scrap plywood and a 2x10 segment. I ripped the 2x10 to essentially create two 2x4 for the front and back frame. The main platform is made from a biscuit jointed sheet of 3/4" plywood (i didn't have anything left wide enough). A 1/4" MDF strip was screwed to the back frame over a dado cut along the 2x4. A slot was cut into this to create a groove for a screw head. Poplar strips where used as slides for the sled.

Miters: I cut two plywood 2" strips  with 45 degree angles. They are checked for a perfect right angle and are screwed down. It would be better to have them on the opposite side so the angle points towards the cut, but I couldn't afford to cut off the corners of the MDF backing frame to accommodate wide pieces. It's hard to explain, but the corners of the sled were cut so the right angle meets within the cutting area. I have tested this setup and it works perfectly. Care must be taken while cutting to avoid digit detachment. 

Another view. The MDF backing allows stop blocks with a wing nut to be clamped in place. For repeating cuts, this is perfect. The 2x4's were glued and screwed in place.

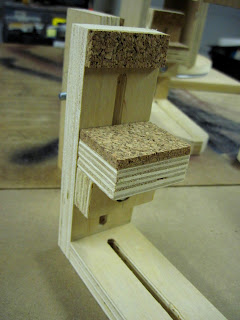
When joining miters, the strength of the joints can be increased with the addition of splines. I've seen a number of jigs for cutting the spline. Some are free sliding jigs that run along the table saw fence. Some, like mine, are part of a sled jig. It's the frankenstein's monster of jigs, using 4 different types of scrap wood. A red oak beam can be clamped to the MDF backer. Pine pieces form the right angle for the workpiece. A thicker MDF board keeps the workpiece upright. A small triangular support on the other side makes sure the large jig stays in line with the blade.

This allows quick, adjustable passes on the workpiece to cut the splines. I had to make sure while designing this (in AutoCAD again), that the screws I use to hold everything together didn't get in the way of the saw blade. I don't much like using glue when screws will work fine.

The bottom. My design has a slight flaw in that it is quite difficult to square. The slight adjustments need to be done on the two poplar runners instead of the backer frame. I have it very close now. Definitely square enough whereas human error may be more significant.

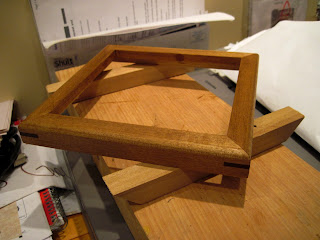
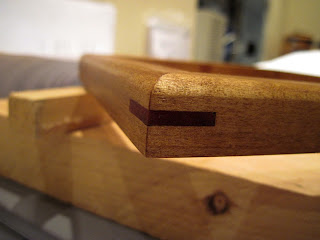
I was eager to try everything out, so I grabbed a length of poplar scrap, cut 4 equal pieces with the stop block, cut the 45 degree miters, and glued the pieces together with a band clamp. I took a scrap mahogany block from my guitar neck and used the sled to cut the splines. This procedure would be difficult to do without the sled, and probably could only be done otherwise on a bandsaw. I attached the spline cutting jig and cut the slots in about 2 passes until the splines fit snugly. They were then glued in.

I used a 1/4" roundover bit to round the small frame, and a 1/4" x 3/8" rabbet bit to cut the glass/picture recess. I have it stained here, and am ready to finish it with poly.

All of this mitering n such was brought forward when I found my EE diploma in a stack of paper from school. I realized I could have easily lost it, so I figured a frame would be nice. They are quite expensive, so I thought I'd make my own. I used AutoCAD...again... to plot the work. Above shows the two piece frame molding with the necessary router cuts on the 1" thick lumber. The outer may be walnut, while the inner being cherry. An inlay channel on the far right of the picture will hold a brass 1/4" inlay. 

AutoCAD render. The bitmap is stock from the internet somewhere. The brass is omitted. I haven't bought the lumber yet, but I now have all of the tools since completing the spline jig.

I also hollow ground all my chisels, and sharpened them. I built a one piece fence for my POS router/router table. 

Money has been tight since I have started work yet (I was hired in May, and they won't give me a start date yet), so I can't start anything new. It's a bit frustrating.

-Andrew

Sunday, October 14, 2012

Rebuild: Update 11

Not much to update on the actual guitar, so this post title may be a little misleading. All to report is the body has 4 coats of epoxy, and the neck has 2. Everything seems level so I will soon order some vinyl sealer and prep for spraying in a few weeks (the more time, the better).

I've been researching dedicated luthier jigs lately, and decided to build a few. I figure it'll be good for the future to have the special tools ready, and not have to keep rebuilding them.


Here's the router jig shown previously, along with six mounting brackets made from more 3/4" birch plywood. They will soon be mounted to a large base. A note on the routing jig: The pine I used for the parallelogram isn't the best material for the bolts to be riding on, and this causes them to rock. I'm going to need to either replace the wood with a harder material (plastic/metal), or order some bearings and recess them in.


 These brackets were made from 2" rips from birch plywood. I plotted some common guitar profiles (a 'standard' acoustic, les paul, es335) in AutoCAD to see where the optimum placement and length for the bases of each bracket. Thus, as you can see from the previous picture, each bracket base has a different length. A wingnut on a bolt with a lock washer is used to adjust the height of the support. Cork was used to cushion the guitar from the birch plywood. These will be perfect for securing and leveling the guitar body for binding routing.

 One problem I recalled having was joining the 12" wide sheets of 1/16" veneer together for the laminate tops (Update #3 from May 2010). The process of doing so was inspired by methods others use to join acoustic guitar plates. I decided to build a more permanent jig for joining. Above is the bottom half of the jig. The holes on the left are for threading the rope, which I will explain later.

The center of the bottom section has a flat surface of 1/4" MDF and plexiglass, held down with some countersunk screws. Also notice the counterbored screws at the plywood intersections. The 2" wide lengths of plywood were joined used a dado? joint, with the counterbored screw. I cut the dados with a few passes on the table saw.

The top portion sitting on the bottom. The purpose of the plexiglass is to prevent the glue at the joint from sticking to the surface and to provide even clamping pressure. 

Here is the joining jig in action. The rope is anchored in the drilled holes to the left. It is then loosely wrapped around the jig 'arms'. With the other end tied off, the rope is tensioned using a 2 foot long wedge. This provides downward and compressive clamping force on the two work pieces (the two shown are just scrap, without a true edge). This will be repeated for all 4 'arms'.

Alternate view. Remember, the sample work piece is only scrap, and not true (it's crazy false). 

A view of the other wedges. I routed all the edges with a slightly lowered 1/4" round-over bit. Doing this eases the sharp, splintering edges along with making the jig look more professional.

I'm moving further into the finishing stages of the guitar, so progress will be slow.

-Andrew

Friday, October 5, 2012

Rebuild: Update 10

I've done more epoxy work along with some jig building. Check it out.

Here is the guitar with the walnut body sanded down to 400 grit, and wiped with naphtha. There's currently 2 epoxy coats on the body, and 1 on the neck.

 Here i'm applying the third coat to the body with a squeegee. As more coats are applied, and the pores are sealing more and more, the amount of epoxy needed per coat decreases.

Left: 1st coat unsanded. Middle: 2nd coat sanded. Right: 3rd coat unsanded.

3rd coat applied. The epoxy now makes the surface reflective as it becomes more level.

More looks at the reflection.

The sides are leveling nicely. I may need to apply one more coat to the entire body, especially the back, as I can see a few spots of grain still showing.


I figured I'd wait until the epoxy cures a lot first before applying a third coat. In the meantime, I decided to build a jig. I was rooting through my scrap pile from the original build and found my makeshift binding router jig. It was terribly inaccurate and prone to making errors. I decided to do some research to find alternatives. I've seen this jig (http://blackwaterriverguitars.com/Tools%20-%20Binding%20Routing%20Jig.html) along with other similar ones online. It looks relatively simple to build, so I began my design. I used AutoCAD to design the jig and give it dimensions. This was based off of mostly pictures and a few dimensions other luthiers listed on their websites. The resulting dimensions from the CAD file were accurate down to 0.01". I virtually drew a 4' x 2' board of plywood in program and laid out each jig piece out to determine the future cuts. I bought the board, some hard pine, a 12" lazy susan, and a 20" drawer slide. I then made each cut on the table saw, using test pieces to check for the ~0.01" (give or take) accuracy. I had all the pieces, and then pretty much screwed it all together. No reshaping. No filing. No mistakes. It went together exactly as the CAD drawing showed. It took about a day and a half to begin research, design, and build the jig.

Ain't she a beaut. A laminate trimmer will soon be mounted to the end of the arm to the left.

The docked drawer. These beefy 20" slides have almost no play to them. The back portion here is nice and flush.

 The arm extended fully, with the 'parallelogram' raised. She has quite a reach. With a router/laminate trimmer mounted, a small counterweight will inevitably be placed on the back end. The router, when used, will have its entire weight supported by the guitar's edge, so the only true purpose for this jig is to keep it perpendicular with the work surface.

Cheesy DOF picture. Them there's some 1/4" 20 4" bolts with locking nuts on the parallelogram. 

The clearance on the drawer is quite small. However, since everything I build is perfect, the sliding drawer wood never comes in contact with the stationary outer drawer.

Mounting a laminate trimmer (handheld router) to the end will be easy. I just need to get one first. I will then test on a scrap piece of wood. The semi-hollow epoxy job will soon get level sanded and recoated.

-Super duper.

Saturday, September 29, 2012

Rebuild: Update 9

20k views. whoopee.

I've begun finishing work. I chose epoxy again for grain/pore filling. This time, however, I'm using the proper epoxy and the proper procedure. I ordered Pacer's Z-poxy finishing resin. Normally reserved for fiberglassing, this epoxy is much less viscous and has a longer open time (20-30 minutes) than the 5 minute Loctite I used before. The procedure was determined through research on luthier forums and a few youtube videos (mainly, this 3 part series: Epoxy Pore Filling Part 1). One big difference in procedure from my first attempt is to build the epoxy up beyond the surface of the wood, resulting in a thin film. The lacquer will then be laid atop. The result should be a perfect glass-smooth finish, without any wood grain showing as pits on the surface.

Step one, prepare the wood. The acetone I used to strip the existing lacquer left a thin film of finish on the surface that needed to be removed. I started with 180 grit sandpaper and continued to 400 grit, followed by a wipe down of naphtha. Some of the binding needed attention. Removing the old binding tore some walnut wood out, most of which I've touched up before adhering the new. However, some spots got filled with binding glue and now look awful.

The binding on the left has been untouched, while the right side has had its walnut/binding seam scraped. You can see the bottom left binding with a little filling of glue. I used an X-acto knife as a scraper and 'picked' out the glue mess-ups.

 I planned ahead and applied the black dye to the headstock before I seal it with epoxy. Letting the dye 'cure' for a few days will prevent any dye from smearing during sealing. 

 I built this stand for the guitar to elevate it off of the table for sealing. This allows me to epoxy the back, top, and sides of the guitar at once without waiting for one section to cure.

It's very well balanced. The back end of the guitar has a screw set in the strap hole which sits on the support.

The fretboard has been taped off, only to see the light of day once the finish is complete. The wood is sanded and waiting for epoxy.

Mix ratios are important, as improper mixing can result in uncured resin/hardener left on the surface or an improper cure in general. I am using a little medicine cup for mixing. My batches are very small so it is difficult to get the ratio right. I will eventually invest in a gram scale for precise measuring. This is difficult to find in a store due to the usual market being 'drug-people'. I got a couple funny looks in the UPS store for asking. My best chance would be to order online. Meanwhile, my spoon method seems to work fine.

 After mixing, briefly heat surface with magic heat dispenser.

And then...do it. Sorry I couldn't take any pictures during the process, but it only involved  pouring a little epoxy on and squeegee-ing it over the surface. After full coverage, squeegee off any excess and remove any drips from the edge.

Once I get one coat over the entire guitar, I will use the stand I built. For some dumb reason I flipped this image around. 

The grain looks great. Further coats of epoxy will make it look more gooder. Yes, more gooder indeed.

Sides will be done next.

I've done a few test pieces, and the first coat merely seals the pores, while the later coats fill up the grain. This shows the guitar top and the sealed surface.
 
New updates will probably include the result of sanding level the surface after all coats of epoxy have been applied.

-APB