Thursday, July 29, 2010

Build Update #11

My gift to you is a smörgåsbord of fine craftsmanship and shiny chrome.


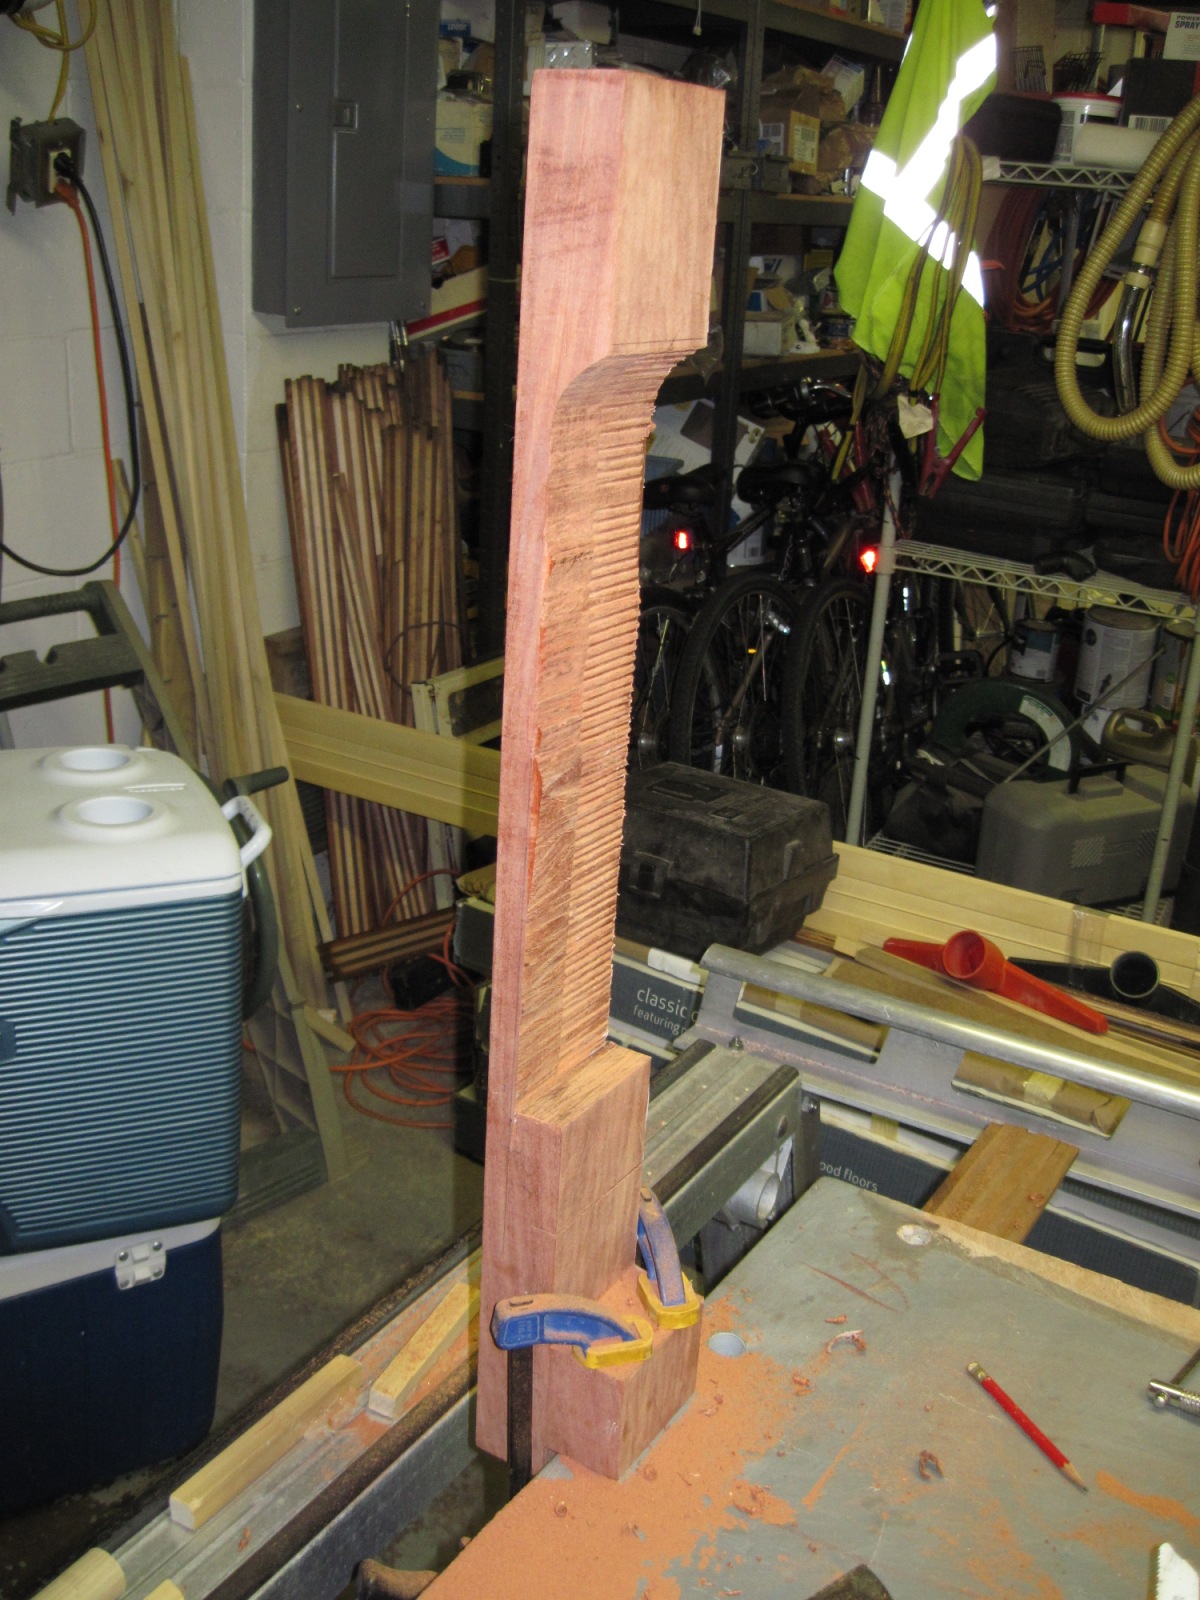
The fretboard was given a blanket of blue tape to protect it during the final neck shaping. Here shown is the center of the neck profile with its final shape (almost). For this, i used a straightedge (xSpeedsquarex) to check for any rocking points. It was also helpful to check for any light shining through the speed-square against the neck. I adjusted my spokeshave so it would remove very little material. I started in the middle and worked my way to the sides, until it was perfectly straight. The profile was made perfectly round by taking a piece of 100 grit sandpaper, wrapping it around the neck, and doing what i call the 'shoe-shining' or the 'old-fashioned-vibrating-belt-machine' maneuver. After sanding, a small, unsanded stripe down the middle of the neck told me that there was a flat spot. I continued sanding until it disappeared completely. Later on, the heel of the neck got its final shape. I regret taking more photographs of the process, because once i felt comfortable with the process, i went at it for hours until it was finished.


Here, the pickup cavity template is taped into place. I used a 7/8" forstner bit to remove most of the material


Here's the result on the bridge pickup.


I used a 1/2" pattern flush bit to remove all the material, then switched to a 1/4" bit to sharpen the 'inner' corners. A 1/2" forstner was then used to hog out the mounting screw holes, which was cleaned up with the 1/4" router bit.


The neck tenon was trimmed to allow the pickup to fit into the cavity at its lowest possible setting. After the first 'step' of the tenon, as seen in the picture, i leveled it off flush with the walnut body.


I cut out two bits of mahogany and glued them underneath the fretboard. After the glue cured, i used tracing paper covered in charcoal to make a rubbing of where the little 'wings' needed to be shaved to sit flush against the walnut. The fretboard binding was sanded flat to remove any file/sanding marks. The marks on the pickup are sticker residue.


I ran into a big problem after i attached the fretboard and shaped the neck. If you recall from my previous post, i sanded the fretboard side of the neck after adjusting the truss rod. Apparently , i didn't sand it enough. There was still quite a bit of back bow to the neck after the fretboard was attached, and since i used titebond to glue it on, there wasn't a chance i could get it off cleanly. I even let the neck sit for 3 days after adjusting before sanding it flat. My solution to this was to loosen the truss rod 'slightly' (1/4 turn) and sand the fretboard perfectly flat. At most, i took off about 1/32" of rosewood near the center (this is only an estimate). I checked the 'flatness' with a long steel computer printer guide-rail i happen to have. The change in the fretboard thickness, to my relief (no pun intended, for those who catch it), is unnoticeable.
To prep the board for frets, i first used a triangular file to bevel the fret slots (google "bevel fret slot"). This prevents the rosewood from tearing out when the frets are pressed into place (or taken out later, if needed). I then rounded the fretboard binding until it was comfortable to the fingers. I gave the board a once-over with 1500 grit sandpaper and a blast of air before applying a large dose of Fret Doctor oil. It is essential for the fretboard to be well oiled to prevent it from drying out and getting damaged.


This really brings out the grain and darkens the wood.


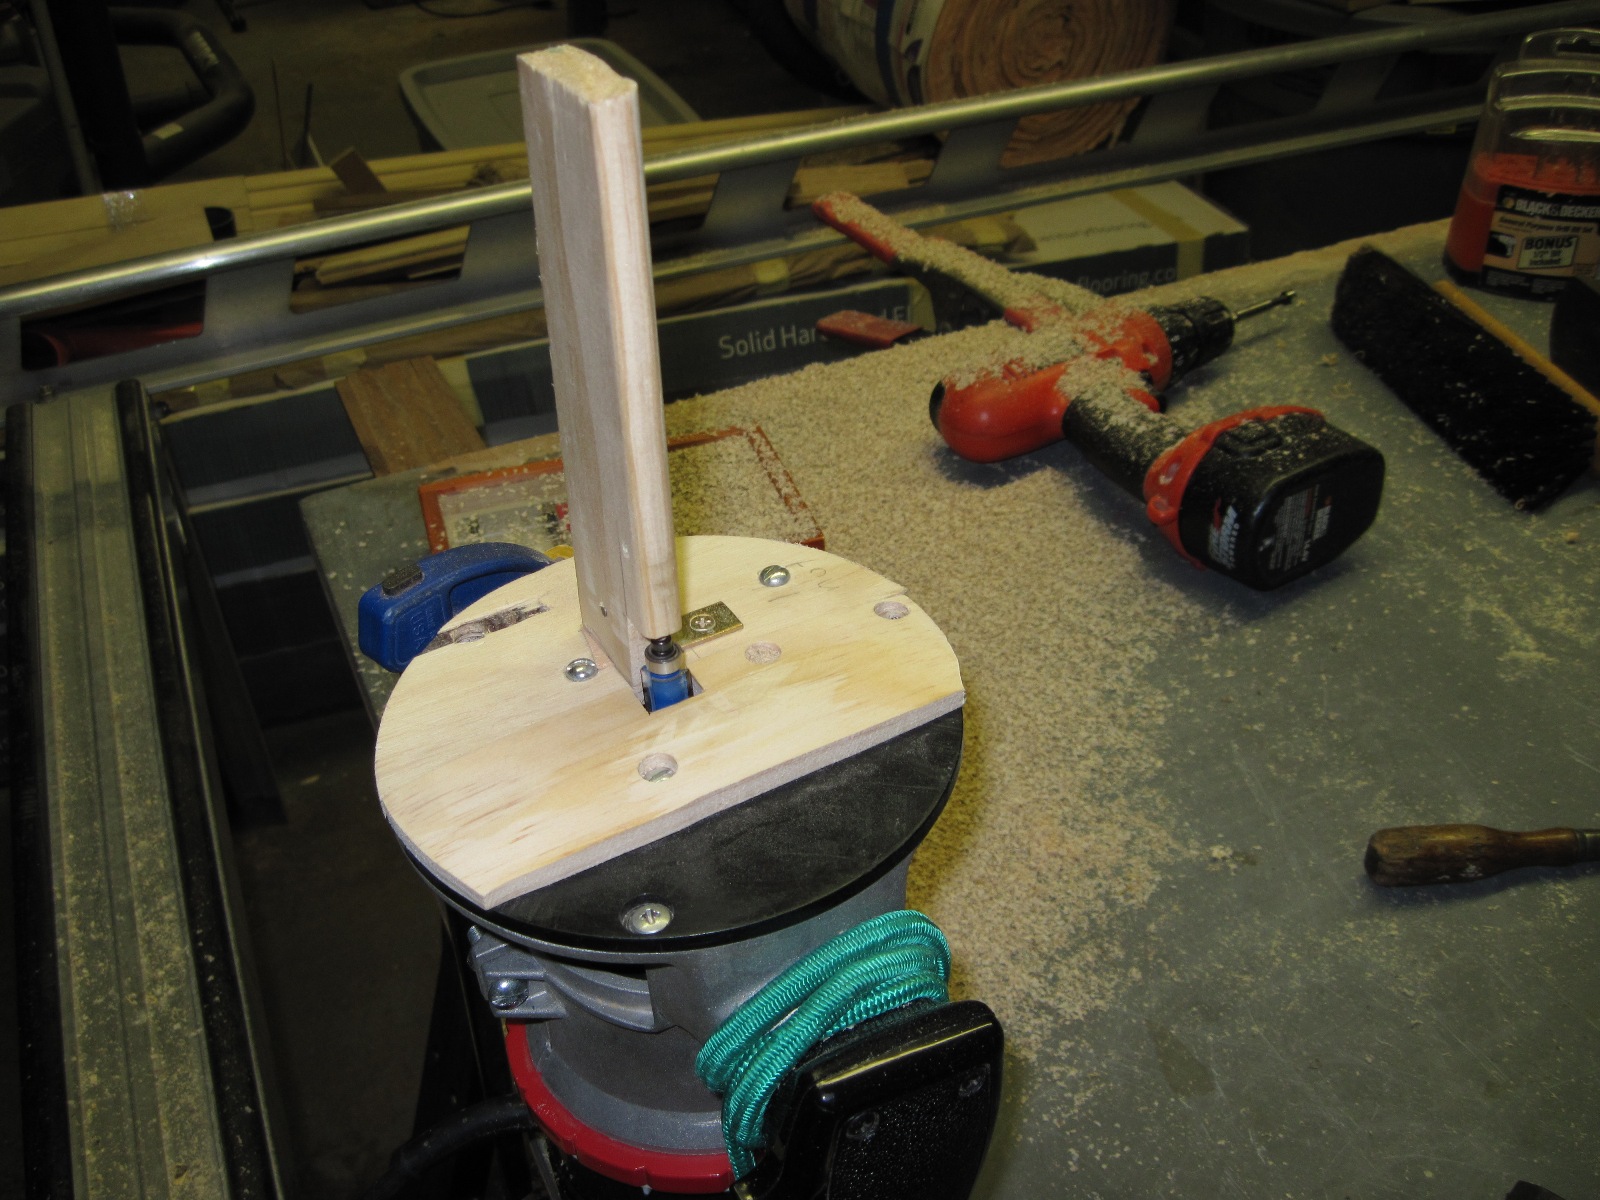
Here is my fret press. It is just a sliver of a 12" sanding block with a cut screw set inside. I placed the screw into the chuck and unplugged the drill press (i had a feeling that out of habit i would turn the press on). The frets seated very easily, except for the higher frets which needed a little extra persuasion with a tack hammer, whose head was layered with 10 or so layers of masking tape. Some experienced luthiers may frown upon my process, but it worked quickly and left the fretboard/neck completely undamaged. Since this is a new fretboard with fresh slots, i didn't use any glue to seat the frets.


Using my homemade fret nippers, i trimmed the frets flush with the side.


I ordered the electronics (w/knobs), bridge, and tailpiece from gutiarfetish.com. While hardware was inexpensive, they certainly aren't cheap. The intonation saddles move smoothly w/o rattle. Then again, i have nothing to compare these with.


My next step is to dress the frets by leveling them, beveling them, and then crowning them. I ordered hide glue and a jewelers saw from LMII to help finish the neck w/inlays.

I felt slightly disappointed when i found out i spent about $500 on all the wood/hardware (i figured to be within $200-$300). I did some other calculations and discovered it would only cost another ~$300 to make another, for i have all the tools/ leftover wood.

I'll also have a homemade guitar to show off, that i didnt pay $3,000 for. Not to mention the knowledge that i've gained is priceless.

-Andrew

Wednesday, July 21, 2010

Build Update #10

This post is strictly on the topic of neck-work. I tried, where possible, to set up the most systematic approach to carving the neck profile. This post should efficiently document each step i take to finish the neck.


After the truss rod channel was routed, the hole for the anchor was drilled. My 3/8" forstner bit worked well. The end of the truss rod was threaded with a die and the anchor was screwed on. The thread on the back side of the anchor was peened (smash the shit out of it with a hammer) and ground flush.


Here is the mahogany filler strip, cut to the same curve as the channel. This was clamped and glued into place.


Then planed flush with the neck. Also shown is the maple veneer I decided to use (since i had plenty of it) to cover the headstock, instead of holly.


I transferred the neck shape with pencil to the wood and trimmed as much as i could with a jigsaw.


I taped the headstock template to the neck and used a pattern trim bit to route the form.


Turned out well. Very little tear-outs.


Mustache


The remainder of the headstock was trimmed with the spindle sander.


The neck was sanded to about 1/16" from the fretboard. Also, all the body binding was scraped flush, resulting in a grocery bag full of shavings.


Here is the neck in my vise, showing some markings around the headstock.


Here's my arsenal of tools. I mainly used the black rasp/file and the spokeshave to shape the neck. Also shown is the 1st fret and 12th fret profile templates.


Rasp work around the headstock.


MOAR.


The 1st fret and headstock area gets to its final thickness, but not the final profile.


Testing the spokeshave near the center of the neck.


The neck heel gets its rough shape.


A bulk of material was removed from the center of the neck. At this time the truss rod was tightened slightly, and the resulting curve on the neck was sanded flat. This means that, when the string tension is applied, i will be able to put a reverse curve on the neck, if needed, by loosening the truss rod nut.


The fretboard is glued on. I used some spare 12" radius sanding blocks as clamping cauls.


Tomorrow i will give the neck its final shape up flush with the fretboard binding.

Monday, July 19, 2010

Build Update #9

I got the 2nd fretboard on friday and in one day I installed the inlays and binding and radiused the board. The next day i drilled and installed the side fret markers and cut and nipped the frets.


The fretboard in my sanding jig that keeps the sanding block square with the board. I used 100, 150, 220, 400 grits in that order to complete the fretboard.


I couldn't help myself.


I bought the traditional gibson single action truss rod thinking i just needed to route a straight channel, and things would go quickly. After some research, i discovered a curved truss rod channel would work much better (my plans called for a double action truss rod, which would have been simple to install). I did find on the internet a blueprint of a vintage les paul neck, which showed the curved channel. I took some measurements and drew up the curve on a piece of MDF. I then cut it out and sanded flush to the line. The shaped was transferred to another identical piece of MDF via a router with a flush trim bit. These two curved rails were hot glued to the edges of the untrimmed neck blank. A sled was attached to the router, which held a 3/16" router bit. Two little MDF guides were screwed to the base of the sled to keep the router aligned with the MDF rails.


It sled true and smooth. No wobble or rocking. I had to have checked the centering 12 or so times before making the route.


With 1/16" routing increments, i made the route until it was .49" at the deepest, .375" at the nut, and ~.28 at the truss rod anchor (21st fret). I cut a filler to go atop the rod out of a scrap piece of mahogany. It isn't shown, but it was cut to the same curve and planed to fit snug in the slot, if you catch my drift. I later chiseled the truss rod nut cavity and drilled the anchor hole.


I also cut a headstock template from some hard pine, complete with the Gibson mustache.


I spent about an hour scraping the .090" binding down flush with the sides. I decided to go with the .090" over the .060" because the binding channel was ever so slightly deeper than .060", so i went a tad thicker. I ran into problems because there was quite a bit of material to remove. A razor blade with a curved edge acted as a simple scraper to remove the binding. Unfortunately, it scraped at a slight angle and removed a bit more binding than i expected and so now the binding looks really thin. I had a small fit of frustration, but i'm over it. It still looks awesome. here i wiped the wood with a damp cloth. I can't wait.


I cut my fretwire and 'nipped the fret tang' with a pair of modified Husky end nippers. I will wait until the fretboard is attached to the neck to install the frets.


I'm heading out now to pick up a 10-32 die for the end of the truss rod. The mahogany filler strip should get clamped in tonight.

-Andrew

Thursday, July 15, 2010

Build Update #8

I got my order from Stew-Mac on Monday. This includes the fretboard and body binding, truss rod, rosewood fretboard, fretwire, inlays, and humbucker pickup screws.


Here i've created a routing template for the neck mortise. I needed the width to be 1.5", and after cutting the template, it measured exactly 1.500" on my calipers. I was quite surprised. Shown above, i've mounted the template to a scrap piece of wood (right) and precisely adjusted a spacer wood block (left under weights) until i achieved a 4 degree neck angle. To get the correct angle, i measured the height off the table at four points, and used some simple trigonometry to find the angle. I aimed for around 4 +/- .5 degrees.


Before routing, a majority of the material was removed via a forstner bit. The template angle jig was held in place by plenty of hot glue.


After a number of passes, here is the final result. You can see the individual layers of wood. From top to bottom: walnut, maple, maple, maple, spruce, and then the maple centerblock.


After much trimming with the router sled, chisel, and file, the neck tenon fit snug in the mortise.


I knew I would need a radius sanding block eventually, so i made this nifty jig which routes a perfect 12" (or 15") radius cut in a piece of pine. The nut and bolt located behind the router determines the radius. I had a 10" hole cut, but the router was in the way for the bolt. The process was rather tedious, but it got the job done. I routed an 8" long 12" and 15" radius blocks, and a few smaller 12" radius blocks. The small ones can be used for touching up high spots and for pressing and dressing the frets.


I used a router and a jigsaw to cutout a humbucker template from MDF. The template was tested on this piece of pine, where the pickup fit perfectly.


I also needed to radius the fretwire. This is needed because after installation, the frets may want to spring up near the ends, which can cause problems (my 12 string has a bad case of this). To radius the fretwire, i used a design i've seen throughout the interweb and on stew mac. I didn't feel like paying $90 for something that i need this one time, so i made one from a piece of wood, a pulley, and two knex wheels. The radius is arbitrary, only as long as it's less than the radius of the fretboard.


I also made a fretboard template out of MDF. The piece of MDF is from my veneer joining jig from build update #3. In the background you can see the gold Classic 57' humbuckers and their mounting/height screws from stew mac.


After routing flush with the template, the fretboard is to size. Later that evening i went to drill the holes for the 6mm fretboard inlays. The forstner bit would be the logical choice, but the resulting hole would have been too wide for the inlay dot. I found a standard drill bit that cut a hole that let the inlay fit snug. The wobbly drill press i used placed the hole extremely off center, immediately ruining my chances of using the board for dot inlays. So i ordered a new board, along with 6.35mm dot inlays, which should work well with the forstner bit. The board isn't a total loss; i can still use it for block inlays, if i get the chance.


I built a jig to route the binding channels. These channels are 1/4" tall and ~1/16" deep.


The jig. The tall post helps keep the body square to the bit. I didn't worry about grain direction vs. routing direction, as some might with other builds. Since the top is laminate (alternating plies), grain direction means nothing, and i suffered no wood tear outs.


I made some binding glue from scrap binding and acetone. The acetone melts the ABS plastic and creates a sticky paste. A judicious amount of glue was applied to the channel, and the binding was taped to the body.


This will set for 2 days. At that time, the other side of the binding will be adhered. The bindings will be scraped flush with the body once cured. The 2nd fretboard should arrive tomorrow. I have everything set to be able to build the entire fretboard in a day, given i don't mess up the inlays again. Once the fretboard is done, i can attach it to the neck and start its final shaping. Also, the freshly attached fretboard will give me my bearings on how close my neck angle is, in case i need to make any minor adjustments.

Things are moving along.

-Andrew

Tuesday, July 6, 2010

Build Update #7

Now onto the part of the build i knew i'd both hate and enjoy. Carving a guitar neck out of a giant slab of wood is quite enjoyable. Reminds me of the beginning of Jurassic Park when they were unearthing the remains of a velociraptor, only instead of a carnivorous reptile in dirt, i have a small piece of wood inside a bigger piece of wood. Aside from imagining the possibilities of a giant mechanical wooden dinosaur, I've underwent countless measuring and re-measuring before making any cuts. The minuscule room for error forces me to monitor my already finely looked-over steps.


Let's begin.


Unfortunately, i don't have the best bandsaw around. In fact, i would like to classify the 1/3 hp Crapsman 9" bandsaw as a boring kids toy. A brand new blade snapped while trimming the 1/4" top laminate to size. Trimming the excess mahogany from the neck blank took a few extra steps, including drilling pilot holes as shown in the above picture. I cut as far as shown until the individual teeth of the blade started folding sideways (most likely caused by the slow blade speed).


I used a sawzall to finish the cut. Also, near the bottom of the picture, you can see an extra block that i glued to fit the headstock completely within the blank.


My god that looks terrible.


I began to clean up the 'rough' cut by planing flat the headstock. I marked my lines, clamped the neck between some MDF, and.....


......planed it flat. I always try to use hand tools over a machine (better control, more fun).


I then cleaned up the back-of-the-neck-cut by using my trusty router planing sled (which i have used extensively throughout this build). I got the back down to within 3/32" of its final thickness.


It is important the neck tenon be as square as possible. I didn't expect to get this part done today, but the process proved to be quick and relatively easy. Two scrap pieces of wood acted as a guide to cut the first cut at 4 degrees from the vertical (corresponding to the 4 degree neck angle).


With a table saw and handsaw, the excess was trimmed away, as shown.


I then cut the tenon down to size using the same process. Final thicknessing will be done with the router sled. The tenon will fit snugly into the mortise, which will later be routed on the body.


Nice wood figure. Notice the ~4 degree angle where the tenon meets the remainder of the neck.


Next is to finally order the fretting supplies and get the fretboard laid out, along with the truss rod. The neck tenon will soon find it's home, all warm and snug, in the body mortise. Once the fretboard is ready, the neck can get its final shape.

I did receive 2 gold Classic '57 pickups that i purchased for $159 from eBay. A good deal considering the fact that 2 new pickups from Gibson would cost ~$260.

-Aloha