Sunday, February 6, 2011

tsoP deltitnU


-at the bottom front (covered from view by the white towel) water during wetsanding got underneath the lacquer and swelled the wood. Need to respray the area with an aerosol. Luckily, everything else is perfect, so i can completely button up everything else and worry about the spot later (it's an area about 1" by 4").
-Electronics went in smoothly, lacquer's intact. Both pickups work this time.
-Wetsanded with stewmacs papers: 800,1000,1200,1500,2000 grits. Buffed by hand with ScratchX 2.0 and buffed with stewmacs foam buffer with SwirlX.
-Installed gold keystone tuners this time. Drilled the screw holes for the tuners.

-This nitro lacquer reacts with the vinyl covers on my guitar stands (something i noticed before refinishing, when the lacquer pealed away on the neck and bottom), so the towels isolate the finish from the stand.

-I still need to finish shape the nut; buy and install a pickguard, truss rod cover, and strap buttons; and tidy up the lacquer around the fretboard.


Full update soon.

Go Stillers.

Friday, January 7, 2011

Build Update #18

Went through a whole quart of Behlen's Stringed Instrument Lacquer on the guitar. I used a Harbor Freight HVLP spray gun (#66222) with a 4 gallon air compressor. An air filter seen attached below the air regulator on the gun removes most moisture/oil in the air supply.


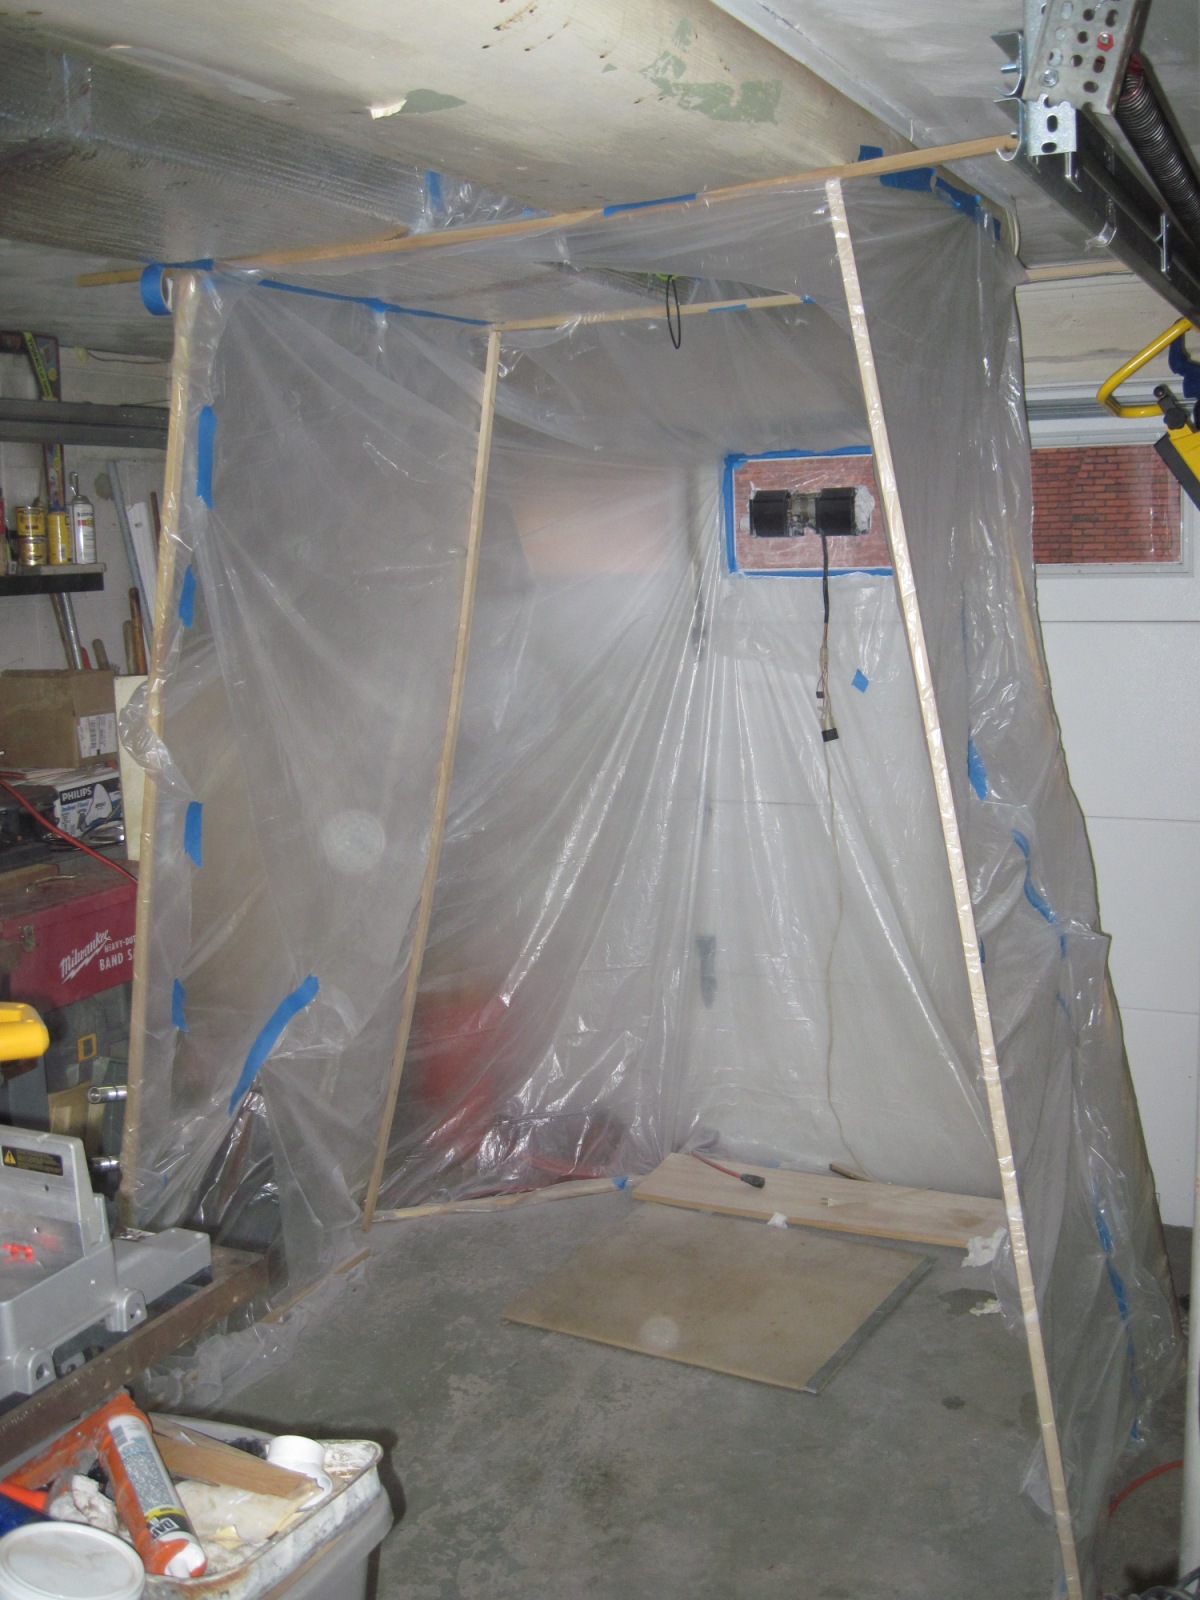
I set up the the booth the same as i did before. This time I used a microwave oven exhaust fan to vent any fumes. While it moves a good deal of air, i found the height location to be of poor choice as much of the fumes gather near the floor. Bending down and inspecting the body proved somewhat overwhelming as the respirator struggled to filter the fumes. I had two 2kW heaters cranked to bring the 45 degree garage up to 66 degrees. A dehumidifier was ready to help with the humidity, but it was unneeded as it's winter and the air was already dry (25-35%).


Another look. The exhaust fan fit into a custom lexan windowpane, leaving the garage door shut to keep the heat in the garage. Return air is pulled from the preheated house. A carpet foam was placed on the floor just in case, for some insane reason, the guitar were to fall. Just covering my bases.


The headstock was given its new black dye and the body was given a full sanding with 400 grit. You can see in this picture the areas where i sanded back to the wood (appear whiter than the body). I needed to do this because as some spots received damage underneath the existing lacquer, so it had to be removed.


After spraying a few coats, the areas that i sanded back showed up darker as seen above. However, this is only but an illusion, as it is actually glossier rather than darker. I assumed it was due to the bare wood not being sealed, so these first coats were thinned to about 60% lacquer/40% thinner. Unfortunately, after applying all 10 coats to the body, these spots still remained glossier than the rest, even after sanding between coats.


I tested this exact scenario on a scrap piece of walnut laminate with the same results occurring. Fortunately, on the tested piece, the shiny 'darker' spots disappeared completely through wet-sanding, leaving a spot free, glass smooth finish.


Noticeable blemishes seen on the walnut visible here on the mahogany neck. It surprises me still that, after many layers of lacquer and level sanding, the blemishes still exist. As long as it'll disappear in the final sanding, i'm not worried.


I rounded the edges of the f-holes. This quick modification made the guitar look so much better than before.


Looking good. After tweeking all the settings on the HVLP gun and getting a good hand in spraying, I was able to apply even, thick coats, preventing major orange peal. Upon inspection, there appears to be some grain still poking through in some spots, but it is not as major as before and will sand out (mostly) in the end.

I'm glad i ran into these problems now. I've learned so much doing lacquer touchups and level sanding that i feel i'm ready for any repairs I may encounter in the future. I would love to start from scratch and avoid all these problems, but that would have to wait for guitar #2. Perhaps next summer.

Add Video

Sunday, December 19, 2010

Build Update #17

I have 3 weeks off for break to refinish this guitar. Here's what I've done so far:


The guitar before refinishing. I had a couple of problems with this:
-The lacquer finish was very thin so it chipped and blemished easily. by blemish, i mean that with the slightest tap with any metal object leaves a white mark under the lacquer.
-The electronics short i mentioned earlier.
-The 'Bauer' logo started raising out of its cutout. This was due, most likely, to the dye i put in the epoxy, which forced it to never cure rock hard by the time I put the lacquer on.
-The exposed grain showing through the lacquer.
-When inserting the electronics, the lacquer got chipped in a number of places.


I had to resand the entire headstock due the to raised logo. I stopped here because i thought, if this was done properly, a pattern like this wouldn't look too bad.


All the lacquer was sanded off of the headstock along with the outer layer of dyed maple. The MOP logo was sanded flush. I will redye the maple before reshooting lacquer.


I started sanding down the body's lacquer. I focused on spots where the grain was highly visible. There was a lot of white blemishes around the output jack where the 1/4" jack bumped into the lacquer, so i sanded completely back to the wood.


The back got the same treatment. One thing i noticed while sanding down was some of the deeper pores were being filled with white powdered lacquer. I wiped most of it out with a naphtha damp cloth, but some still remains. I think leaving this in the grain will aid the refinish because once i spray a thinned coat of lacquer, the lacquer will melt the powder clear and fill the grain.


Here is the electronics taken back out and put into the pattern. Obviously i needed to redesign this to prevent shorts.


This design will allow the whole system to be slipped in in a straight line, one pot at a time. I snatched some new in-line capacitors with a lower tolerance to replace the cheap ones used before. I tested the circuit on both pickups. I also practiced slipping the electronics through the f-hole.


As for refinishing, I got a harbor freight spray gun and a quart of behlen's stringed instrument lacquer. My hopes are that, with this setup, i can lay down a thick layer of lacquer per coat. After the first couple of coats, i will sand the lacquer down until all of the grain is gone. After this, i can shoot the remaining coats and proceed with wet sand, buff, and shine.


In other news, i got a wood moisture meter and checked the didgeridoo branch i set aside from the first post on this blog. It is between 14-18% MC. By next summer, it should be within the seasoned range (roughly 10-12%), and i can split, hollow, and shape.

Had a great semester at PSU, and i'm looking forward to this break. Hopefully i get everything finished that i want by the end of my break. Expect an update sometime after christmas.

Happy Holidays
-Andrew

Thursday, October 21, 2010

Build Update #16

I've been keeping track of my blog 's statistics and realized that there are over 200 views a week. It's been a while so here's an update for you all (no pictures, sorry).

I still haven't addressed the electronics short. It was a pain to get in the guitar, and it will be a pain to get out. I probably won't fix this anytime soon, for reasons i will discuss.

The big problem with the build now, is the finish. I admit I wasn't careful and rushed the finish in the end. A lot of grain is showing through the lacquer and, because it isn't even, it looks bad. I gave the back of the guitar a once-over with 400 grit dry (to remove major orange peel), 400 grit wet, then 600 grit wet. I gave everything a quick hand buff with a rag and got it nice and smooth. It looks nice in some areas, but the stubborn grain won't go away, and in some spots, it was bad enough where water from the sandpaper seeped into the pores of the wood and cracked the finish. I somewhat expected this to happen and was surprisingly not too pissed about the whole ordeal. I planned from the minute I shot the last few coats of lacquer that I would need to refinish it. This is how i believe the refinish process will go for me:

-Since i used lacquer, any future coats should bond well to the existing.
-A liberal sanding will take the lacquer back down to almost the wood (or even the wood itself), depending on how bad the pores are showing.
-If any pores are still existing, a thin, 'localized', coat of thinned epoxy will refill the minute grain leftover.
-A final prep sand and the new lacquer coats can go on.

I figure until that time, i can handle the current state of the electronics. I would have to take out the electronics now, fix them, put them back in, take them back out again when i refinish, then reinstall. Instead, I can take them out to refinish, fix them, refinish the guitar, and reinstall.

In the meantime, I can finish up the nut, find and install a pickguard, and buy and install the strap bolts. I will probably get to going over the whole thing lightly with 600 wet grit sandpaper to make it more comfortable to the skin (the orange peel on the lacquer is quite irritating).

I am currently analyzing a talkbox amplifier circuit that i'm interested in, so expect some future updates related to that.

My roommate is a sneaky bastard and captured this video of me messing with my cheap amp's distortion. Crazy heavy metal.


-Rock and Roll

Wednesday, September 8, 2010

Wednesday, August 25, 2010

Build Update #15

Moved into the apartment at Penn State Erie. I sprayed my last coat on Friday, and left Saturday morning. To transport the guitar for the 2 hour drive meant hanging the guitar, as it was in the booth, on the clothes hanger hook in the minivan. I kept an eye on it during the ride to make sure it didn't swing around too much. I kept it hung in the closet for 4 days until i thought it was cured enough to sit in the guitar stand. Humidity hasn't dropped below 60 since i got here, so it may take some extra time to cure.


The guitar in its stand. The tuners were popped in for shits and giggles. I cut the string slots shallow in the bone nut using homemade feeler gauge saws. I think that, if you prepare and use the saws properly, they can work just as well as expensive nut files. I used a dremel to cut the teeth in the gauges, alternating the angle of the cut. I essentially aimed to replicate the alternating angled teeth on a standard saw. Before cutting these teeth, however, I round the edge of the gauge using some sandpaper, so the cut in the nut will have a round bottom, instead of a square one. The slots will be cut starting with a thin gauge saw and then continuing upward in thickness until reaching the final gauge. The nut will be completed once the finish is cured.


The headstock turned out very purty. The 'orange peel' shown on the finish (in the reflection) will go away during final sanding and buffing.


The epoxy grain filler i used was a pain to remove and in some spots i was a little too zealous on sanding it back to the wood. Some grain, especially around the pickup cavities, has shown through the finish. Speaking of finish... I used one can of sanding sealer (5 coats), and 3 cans of lacquer (5 very thin coats, followed by 10 wet coats [only 8 on the neck]). Some of the grain should disappear during final sanding.

I set my date for final sanding/buffing on Sept. 17th. So my next update will most likely be then.

-Andrew

Tuesday, August 17, 2010

Build Update #14

A lot has been done, but for now, little can be shown for it.


Taking some advice from strangers on the internet, i used epoxy to fill the grain. This image gives a good representation of the purpose of filling wood grain. Epoxy was applied to the right via a razor blade and allowed to cure. The layer of epoxy was sanded completely away until i got back to the wood. It was shot with 2 coats of sanding sealer and a topcoat of lacquer. No furthur modification was made to the wood up to this picture. As you can see, a well defined cut-off point is shown signifying where i did and did not grain fill. To achieve a 'smooth as glass' finish, the grain must be filled. As a side note, this process is needed only for porous woods like mahogany, walnut, and ash.


I began by applying Loctite 60 minute extra time epoxy to the back and let it cure. Unfortunately, after 3 days, it was still as tacky as when i applied it. So my advice to others would be to never use the Loctite 60 minute stuff unless you have a week or two to burn waiting for it to cure until sandable. I triple checked the two part mix and was certain i didn't just mix it wrong. Also, it's less viscous than the 5 minute version, so it soaks pretty far into the wood. I spent a whole day removed the tacky goop that I didn't even hesitate to smear all over the back of my guitar. I switched back to the 5 minute Loctite and things went much more smoothly, with the surface ready to sand in 5 or so hours. I proceeded to apply the epoxy to the remainder of the guitar in small batches using a Dollar General gift card.


I should mention i gave the wood a good sanding beforehand with 100, 150, 220, and 400 grit sandpapers. Followed by a judicious wiping with naphtha. This same process was repeated after sanding the epoxy back down with a random orbital sander.


I built a spray booth in my basement using a couple drop clothes (1 mil 10x20) from Home Depot. A couple sticks of poplar were wedged onto the ceiling to provide a frame. The resulting booth measures about 5'x7'. A 2'x2' fan exhausts the fumes via a make-shift duct out through an ajar garage door.


A copper wire was tied to the garage door tracks and threaded through the booth, providing a good spot to hang the guitar from. Shown is the guitar after 2 coats of sanding sealer.


Again.


An old tshirt was stuffed into the f-holes to stop any spray from getting into the guitar. I also drilled the electronics holes in, literally, 4 minutes. 'Measure twice, cut once' as everyone I know has told me. This time, i measured once, and cut once. I'm sure there shouldn't be any repercussions...


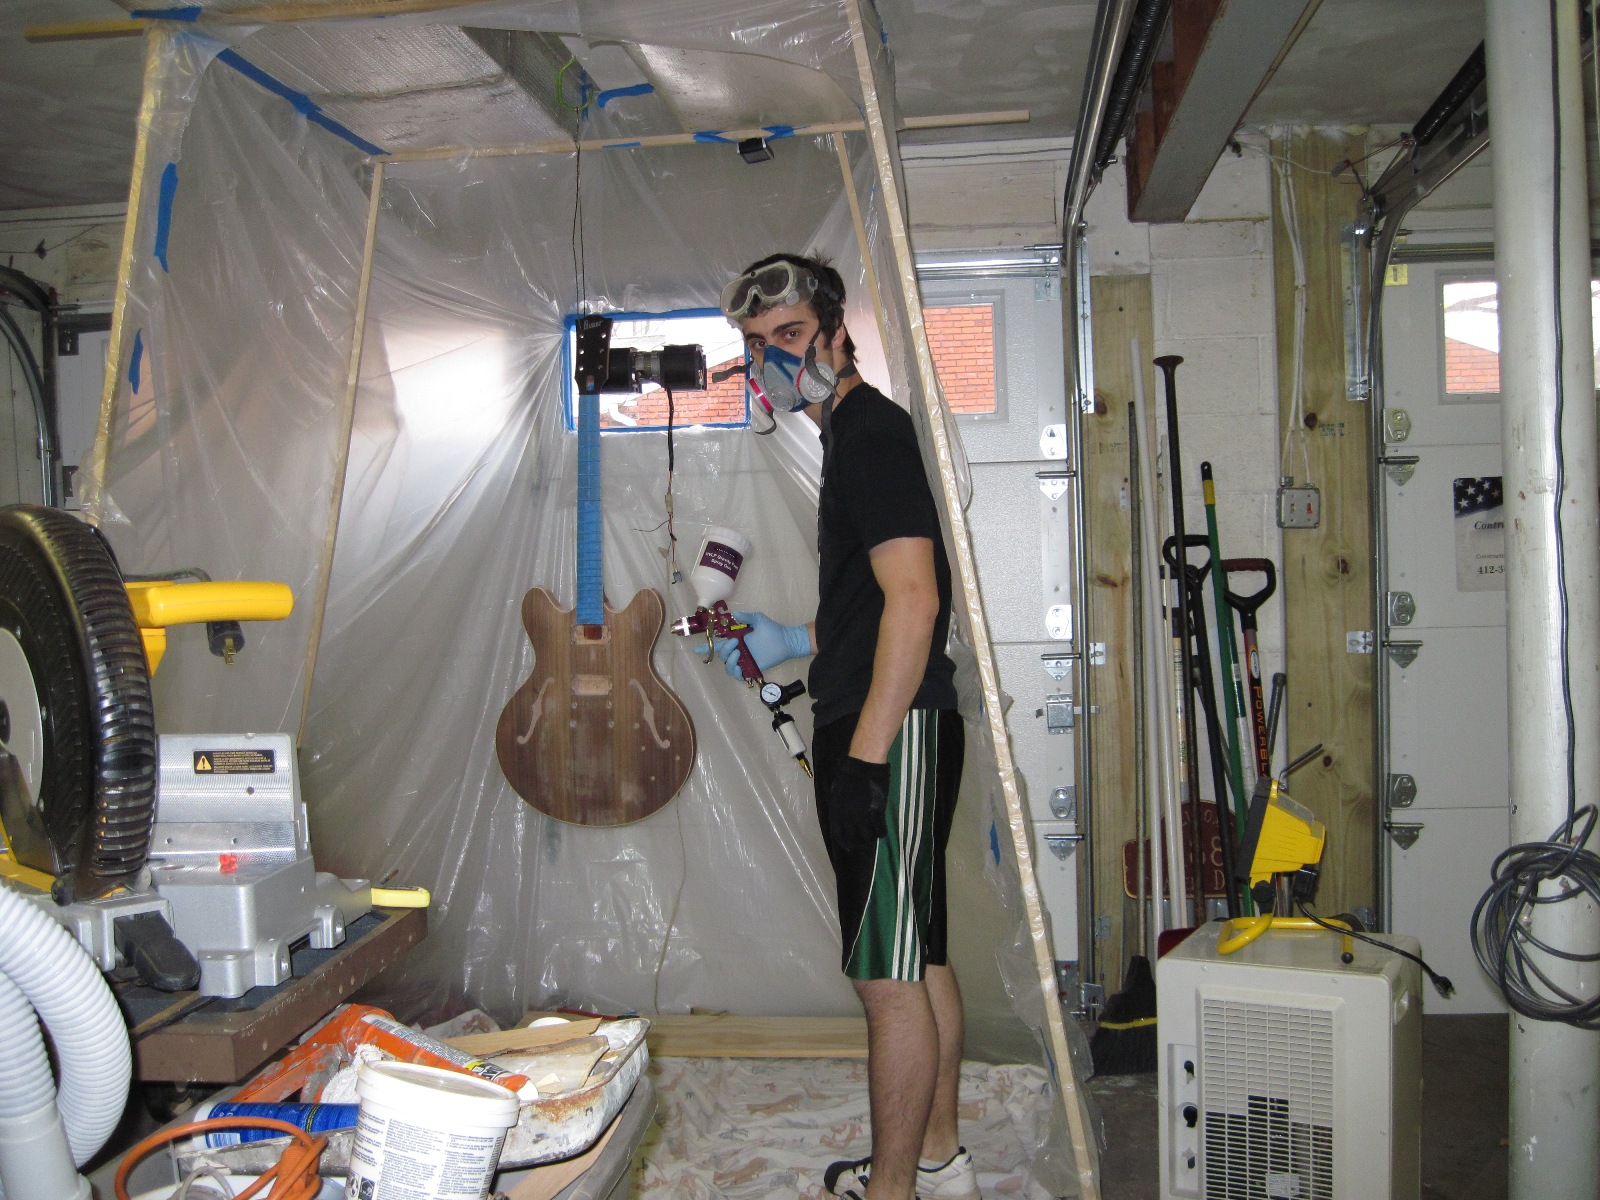
The amateur luthier standing next to his baby. Remember kids, safety first. Latex gloves, respirator, and goggles (they do nothing)**. The booth is also equipped with an $8 digital thermometer/humidostatometergrapher. Frequent checks throughout the day show good signs, with the temperature hovering between 75 and 83 degrees, with the humidity gracefully fluttering between 42 and 50 percent. Excellent, in my opinion, for spraying.


**The goggles, they do something. This is only a 15 year old reference to a popular television series, so please, wear goggles.


Tonight i will apply one more coat of sanding sealer and tomorrow begin with the topcoat applications. One thing i've learned with this whole build, is that if you plan on shaping a bone nut for the headstock, be aware of the location of any dogs within 100 feet or so. I took the nut to the belt sander (ouch) and walked inside, covered in bone dust, only to be chased and licked by our pet beagle. Absolutely terrifying.