The guitar is still relaxing. I still haven't ordered the sealer, so it may be a while until I spray.
In the meantime, I've been prepping again for future woodworking projects by building jigs and tools.
Cross cut sled:
I had scrap plywood and a 2x10 segment. I ripped the 2x10 to essentially create two 2x4 for the front and back frame. The main platform is made from a biscuit jointed sheet of 3/4" plywood (i didn't have anything left wide enough). A 1/4" MDF strip was screwed to the back frame over a dado cut along the 2x4. A slot was cut into this to create a groove for a screw head. Poplar strips where used as slides for the sled.
Miters: I cut two plywood 2" strips with 45 degree angles. They are checked for a perfect right angle and are screwed down. It would be better to have them on the opposite side so the angle points towards the cut, but I couldn't afford to cut off the corners of the MDF backing frame to accommodate wide pieces. It's hard to explain, but the corners of the sled were cut so the right angle meets within the cutting area. I have tested this setup and it works perfectly. Care must be taken while cutting to avoid digit detachment.
Another view. The MDF backing allows stop blocks with a wing nut to be clamped in place. For repeating cuts, this is perfect. The 2x4's were glued and screwed in place.
When joining miters, the strength of the joints can be increased with the addition of splines. I've seen a number of jigs for cutting the spline. Some are free sliding jigs that run along the table saw fence. Some, like mine, are part of a sled jig. It's the frankenstein's monster of jigs, using 4 different types of scrap wood. A red oak beam can be clamped to the MDF backer. Pine pieces form the right angle for the workpiece. A thicker MDF board keeps the workpiece upright. A small triangular support on the other side makes sure the large jig stays in line with the blade.
This allows quick, adjustable passes on the workpiece to cut the splines. I had to make sure while designing this (in AutoCAD again), that the screws I use to hold everything together didn't get in the way of the saw blade. I don't much like using glue when screws will work fine.
The bottom. My design has a slight flaw in that it is quite difficult to square. The slight adjustments need to be done on the two poplar runners instead of the backer frame. I have it very close now. Definitely square enough whereas human error may be more significant.
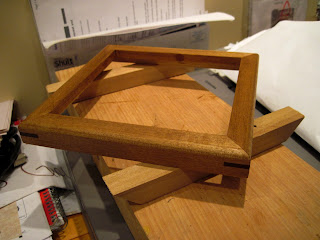
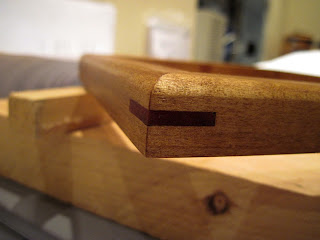
I was eager to try everything out, so I grabbed a length of poplar scrap, cut 4 equal pieces with the stop block, cut the 45 degree miters, and glued the pieces together with a band clamp. I took a scrap mahogany block from my guitar neck and used the sled to cut the splines. This procedure would be difficult to do without the sled, and probably could only be done otherwise on a bandsaw. I attached the spline cutting jig and cut the slots in about 2 passes until the splines fit snugly. They were then glued in.
I used a 1/4" roundover bit to round the small frame, and a 1/4" x 3/8" rabbet bit to cut the glass/picture recess. I have it stained here, and am ready to finish it with poly.
All of this mitering n such was brought forward when I found my EE diploma in a stack of paper from school. I realized I could have easily lost it, so I figured a frame would be nice. They are quite expensive, so I thought I'd make my own. I used AutoCAD...again... to plot the work. Above shows the two piece frame molding with the necessary router cuts on the 1" thick lumber. The outer may be walnut, while the inner being cherry. An inlay channel on the far right of the picture will hold a brass 1/4" inlay.
AutoCAD render. The bitmap is stock from the internet somewhere. The brass is omitted. I haven't bought the lumber yet, but I now have all of the tools since completing the spline jig.
I also hollow ground all my chisels, and sharpened them. I built a one piece fence for my POS router/router table.
Money has been tight since I have started work yet (I was hired in May, and they won't give me a start date yet), so I can't start anything new. It's a bit frustrating.
-Andrew
Wednesday, November 14, 2012
Subscribe to:
Post Comments (Atom)


Thanks you for sharing this unique useful information content about gear hobbing machine for sale with us. Really awesome work. keep on blogging
ReplyDelete