I've been researching dedicated luthier jigs lately, and decided to build a few. I figure it'll be good for the future to have the special tools ready, and not have to keep rebuilding them.
Here's the router jig shown previously, along with six mounting brackets made from more 3/4" birch plywood. They will soon be mounted to a large base. A note on the routing jig: The pine I used for the parallelogram isn't the best material for the bolts to be riding on, and this causes them to rock. I'm going to need to either replace the wood with a harder material (plastic/metal), or order some bearings and recess them in.
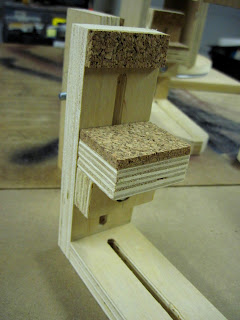
These brackets were made from 2" rips from birch plywood. I plotted some common guitar profiles (a 'standard' acoustic, les paul, es335) in AutoCAD to see where the optimum placement and length for the bases of each bracket. Thus, as you can see from the previous picture, each bracket base has a different length. A wingnut on a bolt with a lock washer is used to adjust the height of the support. Cork was used to cushion the guitar from the birch plywood. These will be perfect for securing and leveling the guitar body for binding routing.
One problem I recalled having was joining the 12" wide sheets of 1/16" veneer together for the laminate tops (Update #3 from May 2010). The process of doing so was inspired by methods others use to join acoustic guitar plates. I decided to build a more permanent jig for joining. Above is the bottom half of the jig. The holes on the left are for threading the rope, which I will explain later.
The center of the bottom section has a flat surface of 1/4" MDF and plexiglass, held down with some countersunk screws. Also notice the counterbored screws at the plywood intersections. The 2" wide lengths of plywood were joined used a dado? joint, with the counterbored screw. I cut the dados with a few passes on the table saw.
The top portion sitting on the bottom. The purpose of the plexiglass is to prevent the glue at the joint from sticking to the surface and to provide even clamping pressure.
Here is the joining jig in action. The rope is anchored in the drilled holes to the left. It is then loosely wrapped around the jig 'arms'. With the other end tied off, the rope is tensioned using a 2 foot long wedge. This provides downward and compressive clamping force on the two work pieces (the two shown are just scrap, without a true edge). This will be repeated for all 4 'arms'.
Alternate view. Remember, the sample work piece is only scrap, and not true (it's crazy false).
A view of the other wedges. I routed all the edges with a slightly lowered 1/4" round-over bit. Doing this eases the sharp, splintering edges along with making the jig look more professional.
I'm moving further into the finishing stages of the guitar, so progress will be slow.
-Andrew


No comments:
Post a Comment