Wednesday, July 21, 2010

Build Update #10

This post is strictly on the topic of neck-work. I tried, where possible, to set up the most systematic approach to carving the neck profile. This post should efficiently document each step i take to finish the neck.


After the truss rod channel was routed, the hole for the anchor was drilled. My 3/8" forstner bit worked well. The end of the truss rod was threaded with a die and the anchor was screwed on. The thread on the back side of the anchor was peened (smash the shit out of it with a hammer) and ground flush.


Here is the mahogany filler strip, cut to the same curve as the channel. This was clamped and glued into place.


Then planed flush with the neck. Also shown is the maple veneer I decided to use (since i had plenty of it) to cover the headstock, instead of holly.


I transferred the neck shape with pencil to the wood and trimmed as much as i could with a jigsaw.


I taped the headstock template to the neck and used a pattern trim bit to route the form.


Turned out well. Very little tear-outs.


Mustache


The remainder of the headstock was trimmed with the spindle sander.


The neck was sanded to about 1/16" from the fretboard. Also, all the body binding was scraped flush, resulting in a grocery bag full of shavings.


Here is the neck in my vise, showing some markings around the headstock.


Here's my arsenal of tools. I mainly used the black rasp/file and the spokeshave to shape the neck. Also shown is the 1st fret and 12th fret profile templates.


Rasp work around the headstock.


MOAR.


The 1st fret and headstock area gets to its final thickness, but not the final profile.


Testing the spokeshave near the center of the neck.


The neck heel gets its rough shape.


A bulk of material was removed from the center of the neck. At this time the truss rod was tightened slightly, and the resulting curve on the neck was sanded flat. This means that, when the string tension is applied, i will be able to put a reverse curve on the neck, if needed, by loosening the truss rod nut.


The fretboard is glued on. I used some spare 12" radius sanding blocks as clamping cauls.


Tomorrow i will give the neck its final shape up flush with the fretboard binding.

Monday, July 19, 2010

Build Update #9

I got the 2nd fretboard on friday and in one day I installed the inlays and binding and radiused the board. The next day i drilled and installed the side fret markers and cut and nipped the frets.


The fretboard in my sanding jig that keeps the sanding block square with the board. I used 100, 150, 220, 400 grits in that order to complete the fretboard.


I couldn't help myself.


I bought the traditional gibson single action truss rod thinking i just needed to route a straight channel, and things would go quickly. After some research, i discovered a curved truss rod channel would work much better (my plans called for a double action truss rod, which would have been simple to install). I did find on the internet a blueprint of a vintage les paul neck, which showed the curved channel. I took some measurements and drew up the curve on a piece of MDF. I then cut it out and sanded flush to the line. The shaped was transferred to another identical piece of MDF via a router with a flush trim bit. These two curved rails were hot glued to the edges of the untrimmed neck blank. A sled was attached to the router, which held a 3/16" router bit. Two little MDF guides were screwed to the base of the sled to keep the router aligned with the MDF rails.


It sled true and smooth. No wobble or rocking. I had to have checked the centering 12 or so times before making the route.


With 1/16" routing increments, i made the route until it was .49" at the deepest, .375" at the nut, and ~.28 at the truss rod anchor (21st fret). I cut a filler to go atop the rod out of a scrap piece of mahogany. It isn't shown, but it was cut to the same curve and planed to fit snug in the slot, if you catch my drift. I later chiseled the truss rod nut cavity and drilled the anchor hole.


I also cut a headstock template from some hard pine, complete with the Gibson mustache.


I spent about an hour scraping the .090" binding down flush with the sides. I decided to go with the .090" over the .060" because the binding channel was ever so slightly deeper than .060", so i went a tad thicker. I ran into problems because there was quite a bit of material to remove. A razor blade with a curved edge acted as a simple scraper to remove the binding. Unfortunately, it scraped at a slight angle and removed a bit more binding than i expected and so now the binding looks really thin. I had a small fit of frustration, but i'm over it. It still looks awesome. here i wiped the wood with a damp cloth. I can't wait.


I cut my fretwire and 'nipped the fret tang' with a pair of modified Husky end nippers. I will wait until the fretboard is attached to the neck to install the frets.


I'm heading out now to pick up a 10-32 die for the end of the truss rod. The mahogany filler strip should get clamped in tonight.

-Andrew

Thursday, July 15, 2010

Build Update #8

I got my order from Stew-Mac on Monday. This includes the fretboard and body binding, truss rod, rosewood fretboard, fretwire, inlays, and humbucker pickup screws.


Here i've created a routing template for the neck mortise. I needed the width to be 1.5", and after cutting the template, it measured exactly 1.500" on my calipers. I was quite surprised. Shown above, i've mounted the template to a scrap piece of wood (right) and precisely adjusted a spacer wood block (left under weights) until i achieved a 4 degree neck angle. To get the correct angle, i measured the height off the table at four points, and used some simple trigonometry to find the angle. I aimed for around 4 +/- .5 degrees.


Before routing, a majority of the material was removed via a forstner bit. The template angle jig was held in place by plenty of hot glue.


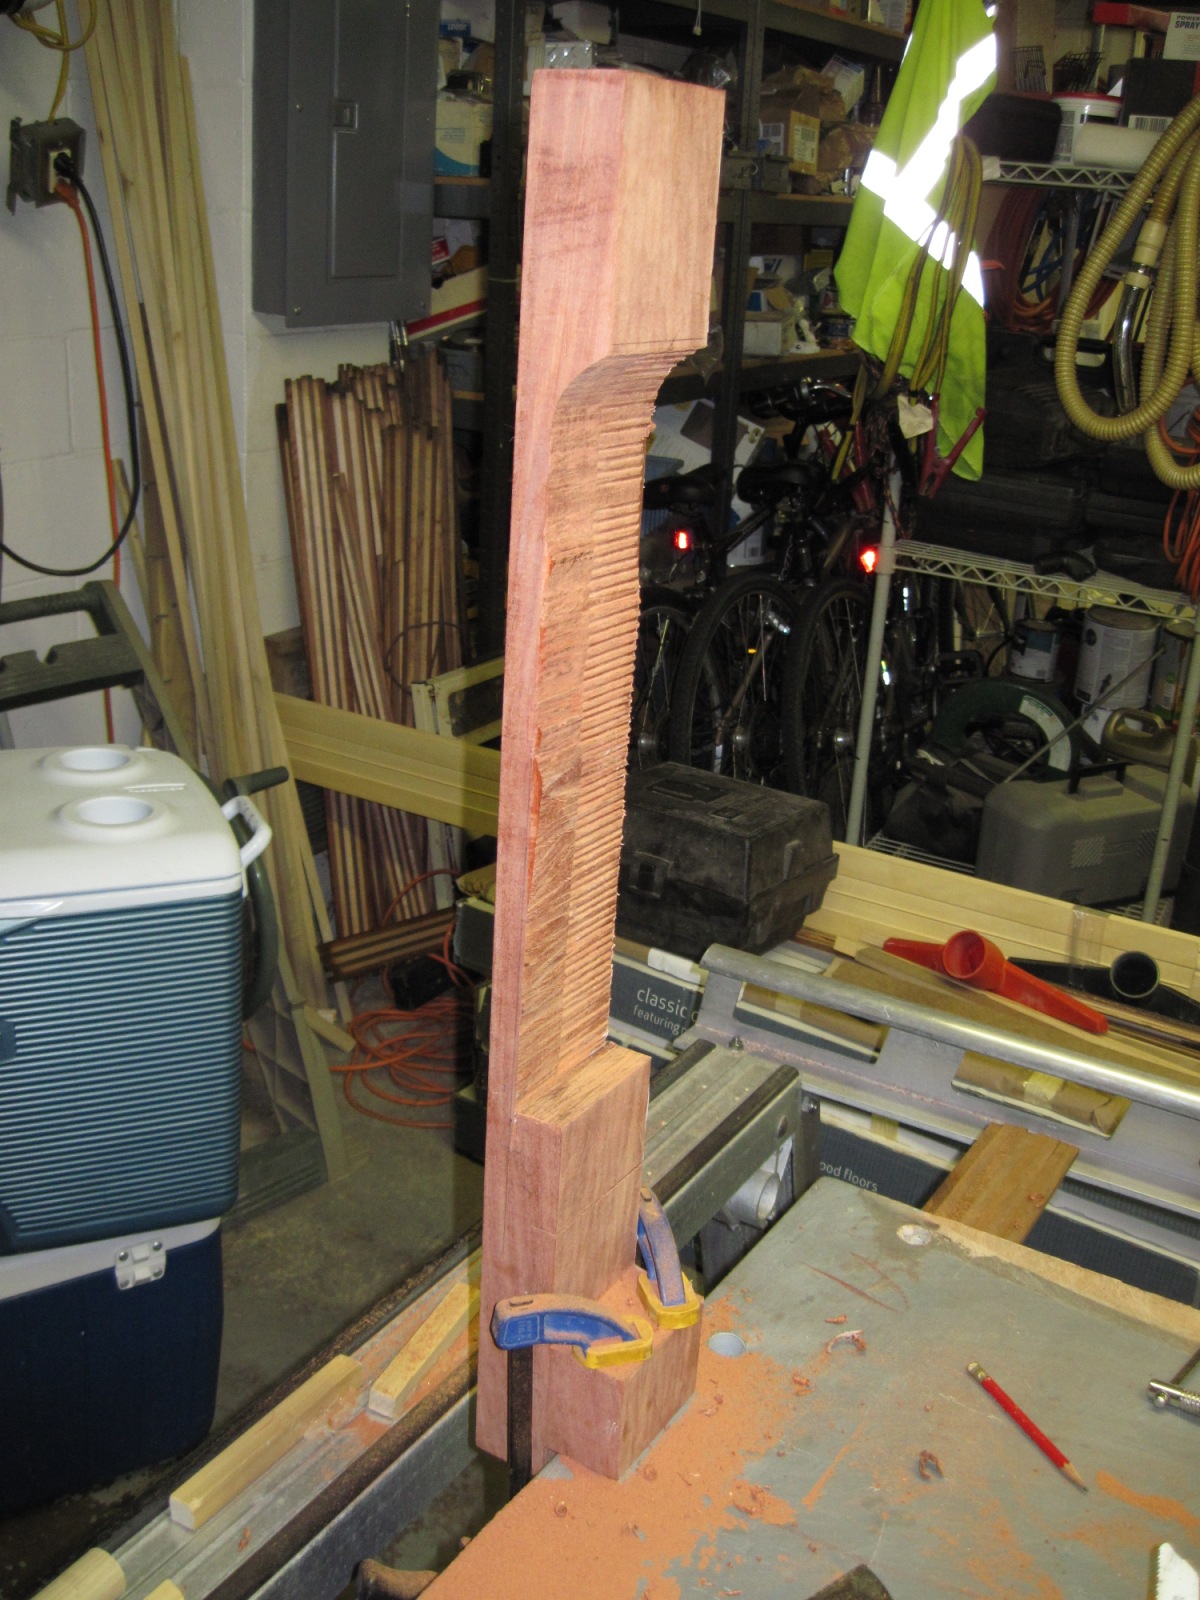
After a number of passes, here is the final result. You can see the individual layers of wood. From top to bottom: walnut, maple, maple, maple, spruce, and then the maple centerblock.


After much trimming with the router sled, chisel, and file, the neck tenon fit snug in the mortise.


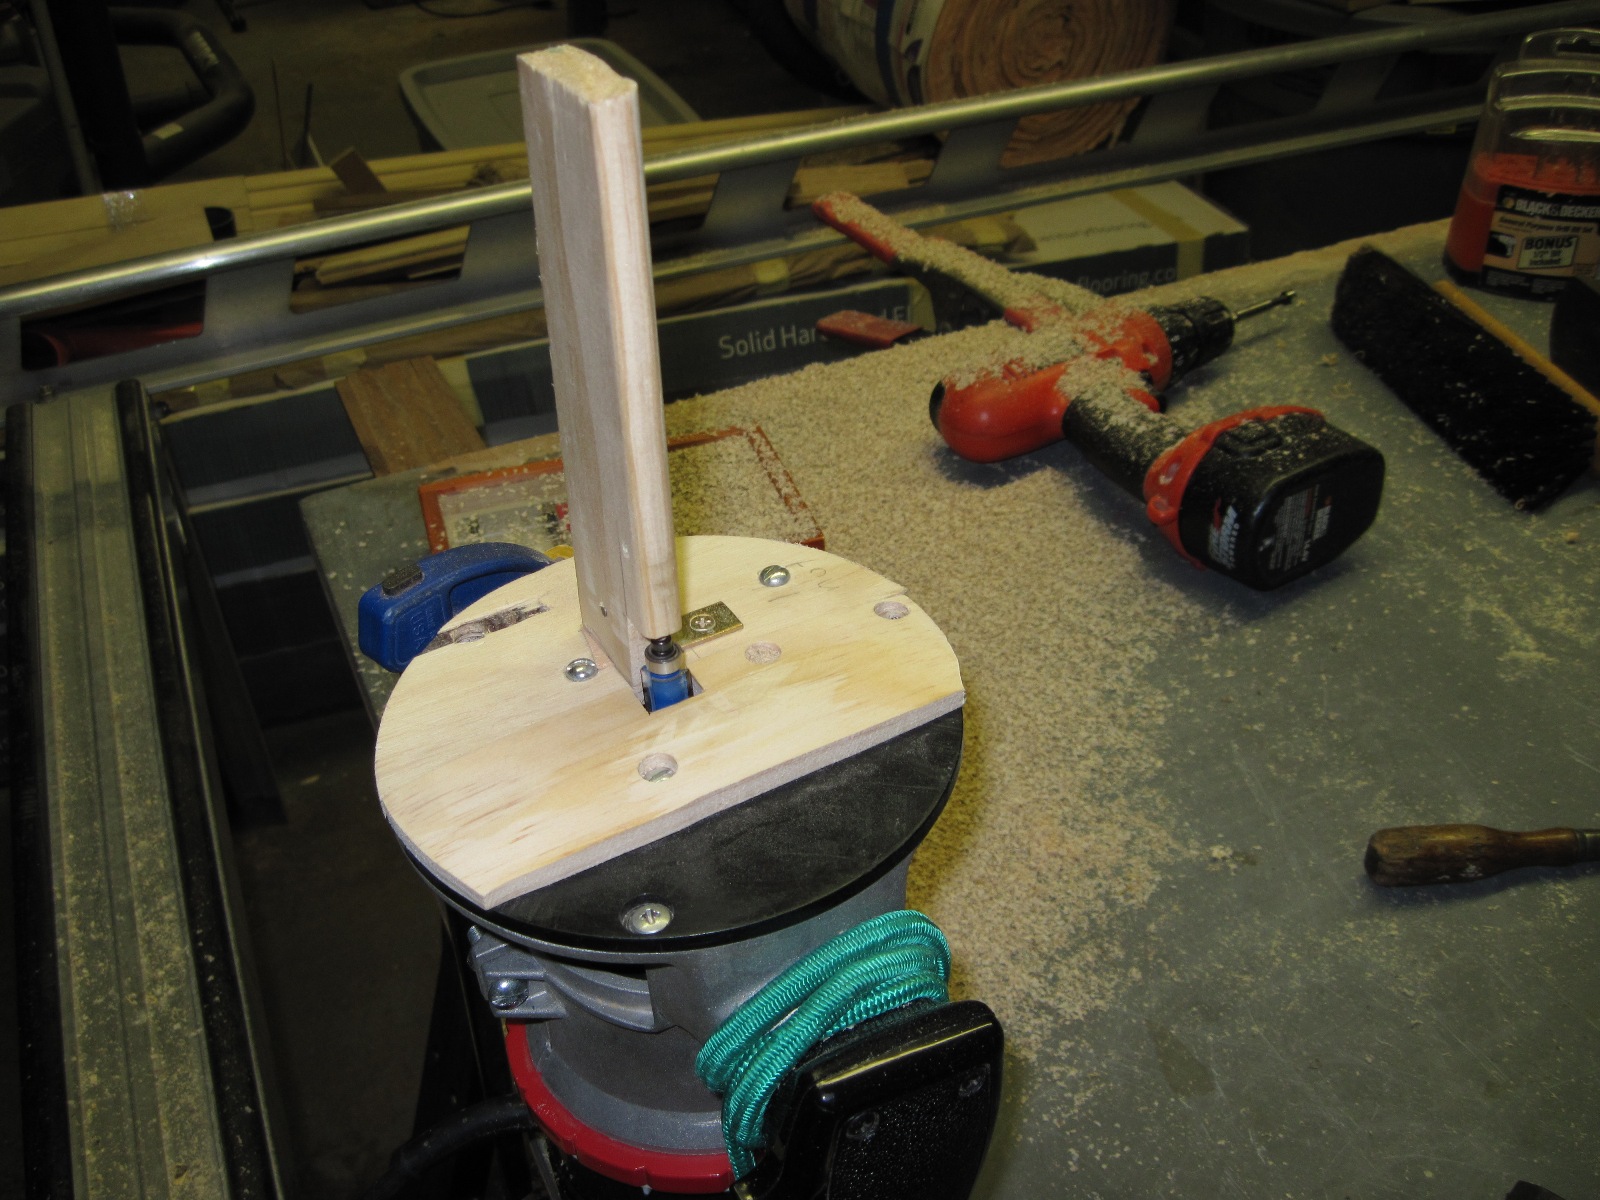
I knew I would need a radius sanding block eventually, so i made this nifty jig which routes a perfect 12" (or 15") radius cut in a piece of pine. The nut and bolt located behind the router determines the radius. I had a 10" hole cut, but the router was in the way for the bolt. The process was rather tedious, but it got the job done. I routed an 8" long 12" and 15" radius blocks, and a few smaller 12" radius blocks. The small ones can be used for touching up high spots and for pressing and dressing the frets.


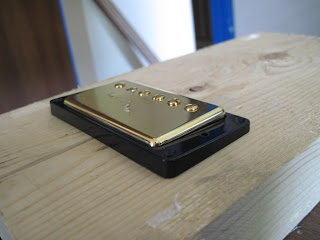
I used a router and a jigsaw to cutout a humbucker template from MDF. The template was tested on this piece of pine, where the pickup fit perfectly.


I also needed to radius the fretwire. This is needed because after installation, the frets may want to spring up near the ends, which can cause problems (my 12 string has a bad case of this). To radius the fretwire, i used a design i've seen throughout the interweb and on stew mac. I didn't feel like paying $90 for something that i need this one time, so i made one from a piece of wood, a pulley, and two knex wheels. The radius is arbitrary, only as long as it's less than the radius of the fretboard.


I also made a fretboard template out of MDF. The piece of MDF is from my veneer joining jig from build update #3. In the background you can see the gold Classic 57' humbuckers and their mounting/height screws from stew mac.


After routing flush with the template, the fretboard is to size. Later that evening i went to drill the holes for the 6mm fretboard inlays. The forstner bit would be the logical choice, but the resulting hole would have been too wide for the inlay dot. I found a standard drill bit that cut a hole that let the inlay fit snug. The wobbly drill press i used placed the hole extremely off center, immediately ruining my chances of using the board for dot inlays. So i ordered a new board, along with 6.35mm dot inlays, which should work well with the forstner bit. The board isn't a total loss; i can still use it for block inlays, if i get the chance.


I built a jig to route the binding channels. These channels are 1/4" tall and ~1/16" deep.


The jig. The tall post helps keep the body square to the bit. I didn't worry about grain direction vs. routing direction, as some might with other builds. Since the top is laminate (alternating plies), grain direction means nothing, and i suffered no wood tear outs.


I made some binding glue from scrap binding and acetone. The acetone melts the ABS plastic and creates a sticky paste. A judicious amount of glue was applied to the channel, and the binding was taped to the body.


This will set for 2 days. At that time, the other side of the binding will be adhered. The bindings will be scraped flush with the body once cured. The 2nd fretboard should arrive tomorrow. I have everything set to be able to build the entire fretboard in a day, given i don't mess up the inlays again. Once the fretboard is done, i can attach it to the neck and start its final shaping. Also, the freshly attached fretboard will give me my bearings on how close my neck angle is, in case i need to make any minor adjustments.

Things are moving along.

-Andrew

Tuesday, July 6, 2010

Build Update #7

Now onto the part of the build i knew i'd both hate and enjoy. Carving a guitar neck out of a giant slab of wood is quite enjoyable. Reminds me of the beginning of Jurassic Park when they were unearthing the remains of a velociraptor, only instead of a carnivorous reptile in dirt, i have a small piece of wood inside a bigger piece of wood. Aside from imagining the possibilities of a giant mechanical wooden dinosaur, I've underwent countless measuring and re-measuring before making any cuts. The minuscule room for error forces me to monitor my already finely looked-over steps.


Let's begin.


Unfortunately, i don't have the best bandsaw around. In fact, i would like to classify the 1/3 hp Crapsman 9" bandsaw as a boring kids toy. A brand new blade snapped while trimming the 1/4" top laminate to size. Trimming the excess mahogany from the neck blank took a few extra steps, including drilling pilot holes as shown in the above picture. I cut as far as shown until the individual teeth of the blade started folding sideways (most likely caused by the slow blade speed).


I used a sawzall to finish the cut. Also, near the bottom of the picture, you can see an extra block that i glued to fit the headstock completely within the blank.


My god that looks terrible.


I began to clean up the 'rough' cut by planing flat the headstock. I marked my lines, clamped the neck between some MDF, and.....


......planed it flat. I always try to use hand tools over a machine (better control, more fun).


I then cleaned up the back-of-the-neck-cut by using my trusty router planing sled (which i have used extensively throughout this build). I got the back down to within 3/32" of its final thickness.


It is important the neck tenon be as square as possible. I didn't expect to get this part done today, but the process proved to be quick and relatively easy. Two scrap pieces of wood acted as a guide to cut the first cut at 4 degrees from the vertical (corresponding to the 4 degree neck angle).


With a table saw and handsaw, the excess was trimmed away, as shown.


I then cut the tenon down to size using the same process. Final thicknessing will be done with the router sled. The tenon will fit snugly into the mortise, which will later be routed on the body.


Nice wood figure. Notice the ~4 degree angle where the tenon meets the remainder of the neck.


Next is to finally order the fretting supplies and get the fretboard laid out, along with the truss rod. The neck tenon will soon find it's home, all warm and snug, in the body mortise. Once the fretboard is ready, the neck can get its final shape.

I did receive 2 gold Classic '57 pickups that i purchased for $159 from eBay. A good deal considering the fact that 2 new pickups from Gibson would cost ~$260.

-Aloha

Wednesday, June 23, 2010

Build Update #6

I got a lot done lately. The body is basically finished (except for the binding channels and pickup cavities). Here is the final process.


I pressed the front top of the guitar better than i did the back (i kept the veneers aligned between presses). The result is a profile closer to mold's profile. here is a picture of the contours of the front top at an angle. The spruce kerfing has also been added and routed flush.


I traced the shape of the f-holes off of the blueprints and transferred them to a piece of MDF and cut it out with a jigsaw and finished it with a few files. I used a 1/4" router bit to transfer the cut onto the top. The shank of the bit was used as a bearing to ride against the MDF 'stencil'. I again used files to clean up the sharp corners.


I installed the mahogany kerfing as i've done before. The front top is cutout. I wrote some notes inside the guitar, including the date, my name, and materials used. I (hopefully) will never again have to read what i wrote down.


Time to say goodbye. I was thinking of embedding a penny with today's year inside the mahogany tailpiece, but i stopped myself. No need to waste more time.


Smells of rich mahogany.


again.


After some dry tests, i clamped the top on (finally). The spool clamps worked wonders and were worth making for this specific purpose. For those making acoustic, semihollow, or archtop guitars, i recommend stopping at the Home Depot and picking up $28 worth of materials, and making your own spool clamps. Much cheaper. Very simple.


After drying for 24 hours, the clamps were removed. From the beginning, i've always looked forward to giving the guitar a tap. I've created an acoustic box.
I made a jig to hold my router above my workbench. I put a flush trim router bit in and routed flush the sides. This will be the same process for when i route the binding channels.


It felt good to be able to rest the guitar on my leg as if i were playing it.


Contours look great. Notice the reflection of the flash on the walnut. Once i sand and finish it, the effect should be much more noticeable, and beautiful.


I will order most of the parts listed in my previous post sometime this week. I will be in Virginia next week so no work then. I hope to get back and have the parts delivered and ready.

The neck blank got a trim yesterday. I used the same method for routing flat the maple centerblock. Routing into the blank released a violent scent of flowers and lemon. I've worked with mahogany in the past and never encountered this smell before. I guess it's a variety of mahogany i havent used yet (i hope it is mahogany). I might make a rough cut of the neck before i leave this saturday (probably not).


-Andrew

Thursday, June 10, 2010

Build Update #5

Big milestone. I picked up a 4' stick of mahogany and cut some 9 mm x 11 mm triangles using a table saw. Using a homemade sliding jig with a stop, i cut about 108" of kerfing with a bandsaw. The specific piece of mahogany was much more brittle than the others i've gotten in the past, and the kerfing kept breaking. No problems though.


I bought a 24 piece set of clamps for $5 from Harbor Freight (a magical place, full of wonder and amusement) and used them to clamp the kerfing to the guitar sides, with the help of a number of cauls (shown).


I then took a piece of aircraft grade spruce (from www.aircraftspruce.com) and kerfs horizontally and vertically on it. This would allow me to glue it to the inner contours of the 4-ply top with the vacuum press (clamps there to apply some extra pressure).


The next step was to level the freshly attached spruce to the same level as the border of the top. A router was attached to a sled and passed over the spruce.


Eventually, after removing a ridiculously large amount of spruce, the top was ready for trimming and attaching.


The trimmed top is ready. The kerfing is all in place.


I bought a 1-1/4" dowel, 24 bolts, 48 washers, and 24 wing nuts and made 24 spool clamps for only $25 (compared to stewmac's $21 for 6). Along with the spool clamps, i used a $10 deep throat clamp from HF and 2 irwin clamps to apply pressure to the centerblock.


The guitar sides and back joined together.


This will look lovely.


My next step is to repeat the spruce cutting and shaping process for the front of the guitar, along with routing the f-holes. The extra laminate extending outside the sides will be trimmed off using the spindle sander. I will soon need to order these parts/tools: rosewood fretboard (pre-slotted), fret-wire, holly veneer (headstock), binding, plunge router, router bits, machine heads, ToM bridge, stopbar, pearl inlays, pickups........

Hopefully I won't spend too much money on that.


I posted a video on my YouTube channel showing my process for pressing the guitar tops. http://www.youtube.com/watch?v=Agj-PRrwWZQ