Friday, March 29, 2013

Bandsaw: Update 4

More work done, etc, etc, etc....

The wheels need their diameters and crowns. I used the smaller bandsaw motor and hammered a circular piece of plywood to it. I used a cheap set of lathing chisels to make a groove in it to fit the v-belt.

 A sandwich of three circles of plywood make a temporary large pulley seen here. The shaft is clamped to blocks of wood onto the bench.

After a good deal of sharpening, the lathe chisels from Harbor Freight actually cut and I got the wheels to the proper diameter and crowned.

Before and after. I trued out any wobble with the sides of the wheels.

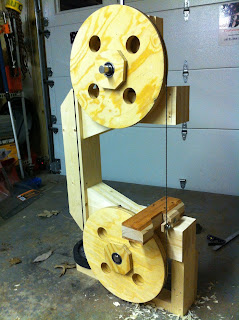
Skipping forward to the bottom wheel, I mounted a ~3/4" piece of plywood to the opposite side of the temporary pulley and cut a groove for the v-belt. I removed the temporary pulley and spun up the wheel as shown. This is the final wheel-pulley assembly.

 I need a dust collector.

Showing the crown, v-belt groove, and spot filling. I eventually coated the wheels with finish.

Just a view of the upper wheel mount assembly. Mostly maple besides the plywood and frame. The hardwoods have been coated with finish.

Different lighting. Looks good.

 Now for the trunion support beam. I needed a thick piece of hardwood (~2.25") for it, so I laminated a 1.5" maple piece with some scrap tiger-wood flooring.

 I trimmed the sides, made a few cuts, and drilled some holes. Looks much better.

In place, along with the lower blade guide mount from maple. Didn't document that much.

Set a blade on the bare wheels. Everything's parallel and smooth. Nice. I would put the tires on, but I couldn't find any store that sells 14" tires nearby. I spent hours and 5 different stores and couldn't find one. 

Pilot holes drilled, and the beam is mounted.

I'll finish the blade guides, and try and get a motor. Still no luck there.

-Pancake

Friday, March 22, 2013

Bandsaw: Update 3

With my job, I only have a few hours each day to work on the saw. Here's what I've gotten done.

I drilled counter-bores and holes for some 5" screws to mount the lower wheel mount. After this, I finished gluing the base pieces into the joints shown. 

I bought a 4'x8' sheet of ~3/8" and a 2'x4' sheet of  ~1/2" plywood for the wheels. With the 1/2" in the middle, a 3 layer sandwich is made. I cut them out with a sabresaw.

Layers being clamped against a barbell underneath. The barbell helps keep it flat. I had an issue with the one side of the barbell being slightly curved, which did curve the final laminate. I hand planed it back down afterwards without an issue.

I used an adjustable circle cutter to cut a hole for the bearings. They have to be incredibly snug. A vice was used to press them in. Shown also here is the upper wheel mount assembly, showing the pitch adjuster bolt and T-nut.

A backing piece of plywood is glued onto the previously shown flanges.

And then glued onto the wheel using some new clamps and a few holes drilled into the wheel.

 The second bearing for each wheel is glued while on the shaft, so I can rotate the wheel to check alignment before final clamping.


One down.

And two.

I'll need a temporary setup for truing the wheels so I pulled this 1/3hp motor from a cheap Craftsman 9" bandsaw (which has perhaps a 3" re-saw capability). A pulley will be affixed to the motor while a larger temporary pulley will be mounted to the wheel clamped to the table. Further updates should clarify this procedure.

Everything's going smoothly.

Over and out.
-Andrew

Saturday, March 16, 2013

Bandsaw: Update 2


I've put a bit more work into the bandsaw. Here's some pics yo.


 With the final frame pieces glued to the upper 'C' section, I hacked off the corners for an aesthetic touch. The circular saw was in an inconvenient location (right out the garage door and in the truck) so I opted for ye' olde fashioned method. The saw was very dull and I regret everything.

Some more parts for the supports glued.


I bought a 1.75" square dowel from Le Home Depoux, planed it to thickness, and made a few crosscuts for the upper wheel mount frame. It looks like maple.


Making great use of my crosscut sled, I sliced up some rabbets. The frame gets glued.


Trimmed and planed slightly.


This is a load bearing part of the saw, carrying the tension of the blade. It needs to be strengthened with splines. It's my spline jig's time to shine. The shims for the splines are in the background. 


Trimmed, etc. 


Here's a used maple bench from a school. I should be able to make all of the hardwood portions with this.


 Shown also in the previous photo, these to thicknessed pieces will make the bottom wheel mount.


 I bought two 1" shafts, 4 bearings, and 4 shaft collars for the saw. Here's one in the lower wheel mount. Look at me, I'm captain america.


Here's a rip cut for the upper wheel mount. It needs to be ~3.5" thick, so I need to cut and join a few. I'm quite surprised at the quality of the maple underneath. Makes me ashamed it's only being used for a structural application. 


 Jumping ahead quite a bit. I joined the upper wheel mount pieces and cut them to shape in a series of complicated and dangerous table saw cuts. A 1" hole was added. I ripped more maple for the frame mounts and drilled 10 holes for mounting. The actual splined frame got trimmed to fit into the frame mounts. It's a tight fit and should work great.


I'll finish up the upper wheel mount mechanism soon, along with mounting the lower mount. Once the lower is mounted, I can glue the remaining base support and motor mounting frame pieces. I'll purchase some plywood soon for the wheels and get them glued while simultaneously shopping for an electric motor.

-Bye.

Saturday, March 9, 2013

Workbench and Bandsaw Update

Here are some updates. Refer to www.woodgears.ca for more info. To first build the bandsaw, I'll need a workbench. I may as well use the plans for a simple workbench from the site.

2x6 ready for the bench.

 Legs joined with dowels. A band clamp holds it during gluing.

One section done, the other waiting. The door is a solid core door and weighs about 80 lbs.

2x6 cross braces screwed to the leg sections, then screwed to the door table.

On its side.

A coat of Sikkens applied. It was wet for about two days afterwards, then abruptly dried completely. Really strange, but most likely due to weather. 


Onto the bandsaw. The plans called for 17mm (0.67") and I had bought 3/4" pine. I purchased this DeWalt planer to do the job.

Rough cuts after ripping, planing, and cross cutting.

All 72 cuts for the bandsaw frame. After cross cutting, I re-ripped each piece to the final width. Calipers and patience allowed me to achieve +/- 0.05 mm.


Final mortise cuts allowed me to roughly assemble the frame.

Adding more.

Laying it out

Beginning gluing with layers 1/2. The first layer here was difficult to glue. The separate pieces shifted with the glue. I couldn't imagine doing this with clamps. I used weights and drywall screws. 


 Layers 1/2/3 done. It's much easier once the frame becomes rigid.

Layers 1/2/3/4 Weights help prevent twisting. 

Layers 1/2/3/4/5

To prevent visible screw holes, the outer layer was only clamped in place.

The screws visible here get cover by one last piece.


More later. 

-Andrew